
Data Connections API
Note: To enable this feature, request it through our form.
Data Connections enable you to integrate static or real-time data into Optimove using APIs. You can upload CSV or JSON files for stable datasets, like customer profiles, or connect to external APIs for dynamic data, such as real-time inventory. This guide provides step-by-step instructions to set up and manage Data Connections, with full endpoint details in the API Reference.
Prerequisites
Before you begin, ensure you have the following:
- An Optimove Personalize account. This will be set up for you after you request the feature.
- Authentication keys (
x-api-keyandx-brand-key) from the Optimove Personalize UI under Developer Tools. - Tools like cURL, Postman, or a programming language (e.g., Python, JavaScript) for making API requests.
Note: You don't need an Optimove Personalize license to use this feature.
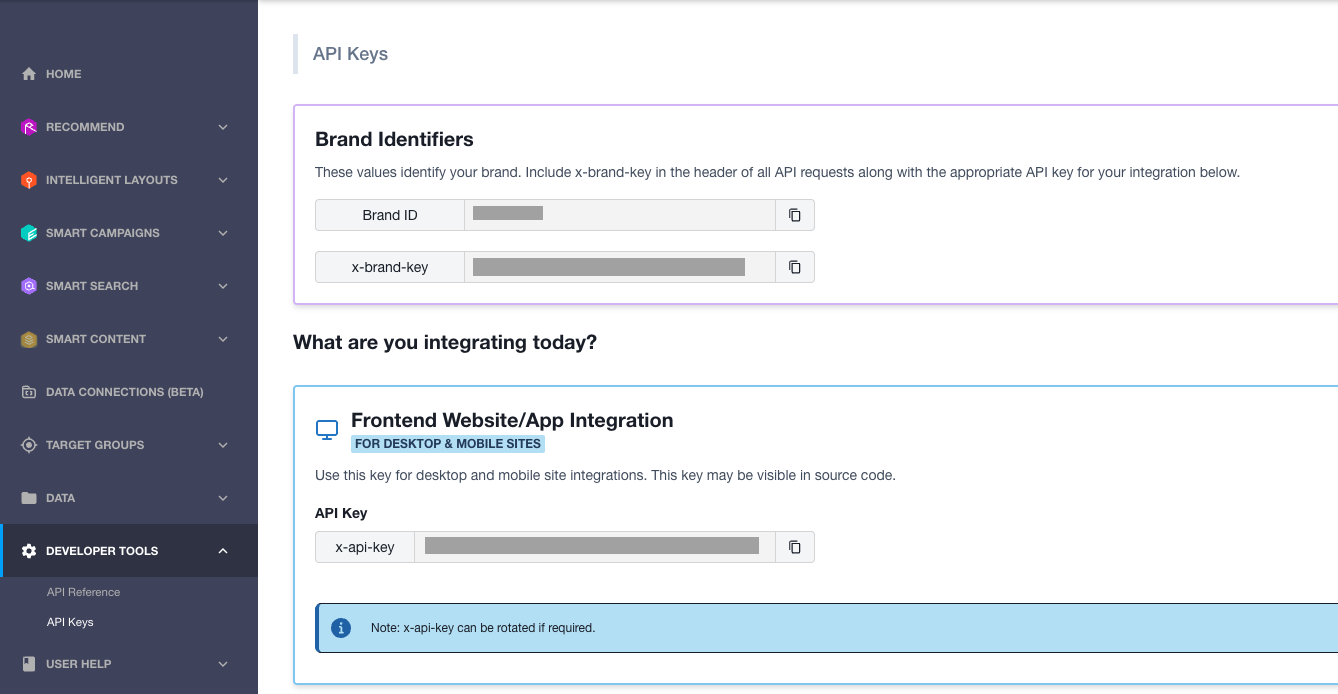
Figure 1: Locate your x-api-key and x-brand-key in the Optimove Personalize UI Developer Tools section.
Choosing a Data Connection Type
Data Connections come in two types, each suited for different use cases:
- Upload-Based Data Connection: Best for static data that updates infrequently, such as customer profiles or product catalogs. Upload CSV or JSON files to store data directly in Optimove.
- API-Based Data Connection: Ideal for dynamic, real-time data, like inventory levels or personalized recommendations. Connect to an external API to fetch data when queried.
Create a Data Connection
You can create a Data Connection to store uploaded data or connect to an external API. Follow these steps to get started.
Upload-Based Data Connection
- Log in to the Optimove Personalize UI and navigate to Developer Tools to retrieve your
x-api-keyandx-brand-key. - Prepare your Data Connection details, including a name, a primary key (e.g.,
user_idto uniquely identify records), and an optional description. - Use the API to create the Data Connection. See the API Reference for the
POST /connectionsendpoint details. - Verify the response includes a unique
data_connection_uuidfor your new connection.
Note: The primary key cannot be changed after creation, so choose it carefully.
API-Based Data Connection
Note: Firewall ConfigurationIf you are setting up an API-based Data Connection and your environment has firewall rules with IP address restrictions, you must allowlist Optimove's IPs. This will permit Optimove to send data to your API.
Please see the and add the IPs listed under the "Optimove Personalize and Data Connections" section.
Request Body Breakdown
The POST /connections endpoint requires a request body with the following fields:
- name (str): The name of the Data Connection.
- primary_key (str): The primary key field for the Data Connection. Note: This cannot be changed via
PUTrequests after creation. - description (str, optional): A description of the Data Connection.
- external_api_details (object, optional): Details for the external API for this Data Connection.
- url (str): The URL of the external API.
- schema_discovery_url (str, optional): URL that returns sample data in the exact structure of the live endpoint. Used during onboarding to infer schema when the live API has no data. Must use the same method, headers, body, and auth as url.
- http_method (str): The HTTP method to use (e.g.,
GET,POST). - headers (object, optional): The headers to send with the API request.
- body (object, optional): The body of the API request.
- ttl (int): Time-to-live for the API data in seconds. Set to
0to not cache API data. The default value is 30 seconds. - timeout (int): Timeout for the API request in seconds.
- retries (int): Number of retries for failed external API requests.
- is_batch_endpoint (bool): Specifies if this Data Connection will be used to make batch API requests.
- sample_placeholder_values (object): Key-value pairs to substitute any placeholders in the
url,headers, orbodyin order to make a test call to the external API to validate the given API request details.
Placeholders in API Details
To allow your API to fetch more dynamic or personalized content, the url, headers, and/or body in external_api_details may contain placeholders. These are populated at request time when querying your Data Connection via the /query endpoint and are specified in the following format: {placeholder_key}. For example, if your url is set to https://api.example.com/data?filter={filter}, then {filter} is a placeholder key, and a value for filter must be passed when making the API request to the /query endpoint.
Example: Creating an API-Based Data Connection
Here’s an example of creating a Data Connection that fetches data from an external API with a placeholder:
curl -X POST "http://api.opti-x.optimove.net/api/data-connections/v1/connections" \
     -H "Content-Type: application/json" \
     -H "x-api-key: YOUR_API_KEY" \
     -H "x-brand-key: YOUR_BRAND_KEY" \
     -d '{
         "name": "External API Connection",
         "primary_key": "id",
         "description": "Fetches user data from an external API",
         "external_api_details": {
             "url": "https://api.example.com/data?filter={filter}",
             "http_method": "GET",
             "headers": {"Authorization": "Bearer YOUR_TOKEN"},
             "ttl": 60,
             "timeout": 10,
             "retries": 3,
             "is_batch_endpoint": false,
             "sample_placeholder_values": {"filter": "active_users"}
         }
     }'
Steps to Create an API-Based Data Connection
- Gather your
x-api-keyandx-brand-keyfrom the Optimove Personalize UI. - Define your Data Connection details, including a name, primary key, and external API settings (e.g., URL, HTTP method, and optional placeholders for dynamic queries).
- Create the Data Connection via the API. Check the API Reference for the
POST /connectionsendpoint. - Confirm the
data_connection_uuidin the response.
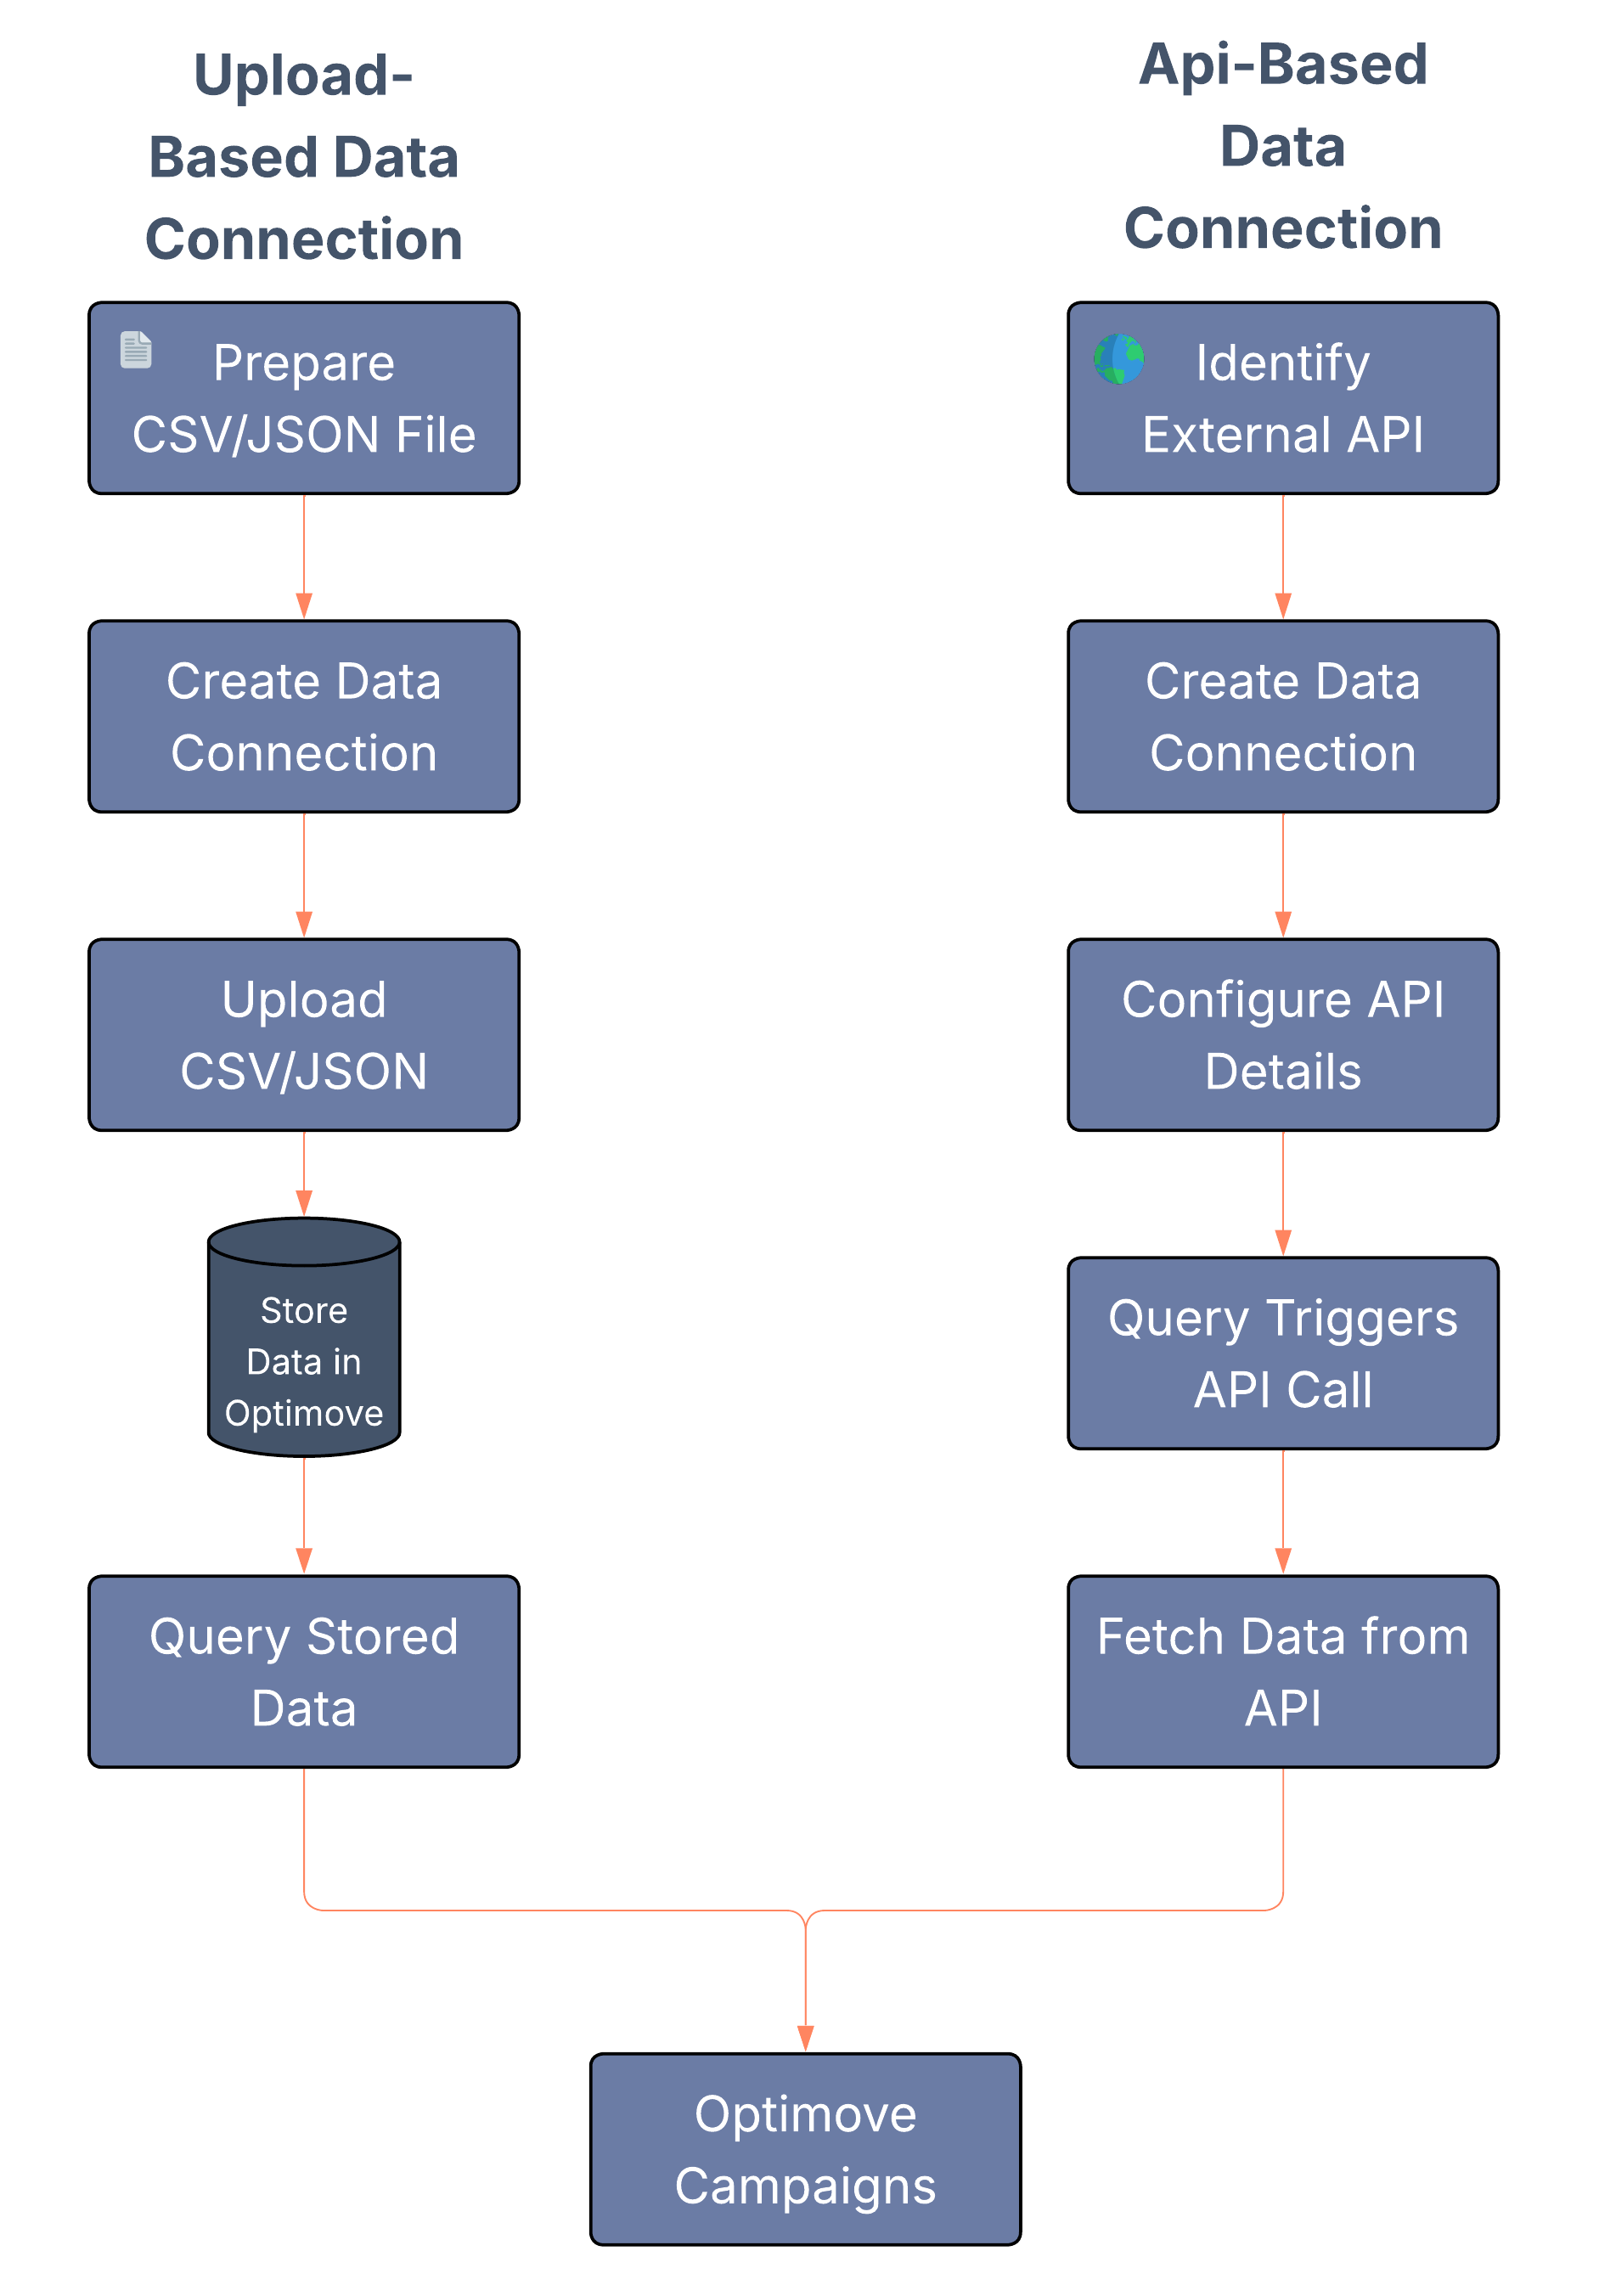
Figure 2: Upload-based Data Connections store static data, while API-based ones fetch dynamic data from external APIs.
Manage Data Connections
Once created, you can list, fetch, update, or delete Data Connections to suit your needs.
List All Data Connections
Retrieve a list of all your Data Connections to view their details, such as names and primary keys. Use the API as described in the API Reference for the GET /connections endpoint.
Fetch a Specific Data Connection
Check the details of a single Data Connection by its data_connection_uuid. See the API Reference for the GET /connections/{data_connection_uuid} endpoint.
Update a Data Connection
Modify a Data Connection’s settings, such as its name or description.
Important: This endpoint (PUT /connections/{data_connection_uuid}) is used to update the connection's metadata (e.g., name, description), not the data records stored within it. To add, change, or remove data records and their parameters, see the Updating Data via API section below.
Note that the primary key cannot be changed after creation. For full details, refer to the API Reference for the PUT /connections/{data_connection_uuid} endpoint.
Delete a Data Connection
Remove a Data Connection when it’s no longer needed. Check the API Reference for the DELETE /connections/{data_connection_uuid} endpoint.
Warning: Deleting a Data Connection is irreversible and removes all associated data.
Upload and Query Data
After creating a Data Connection, you can upload data to it or query its contents.
Updating Data via API (Safe Usage Guidelines)
-
Endpoints
PUT /connections/{dc_uuid}/update_dataPOST /connections/{dc_uuid}/upload_data
-
Core behaviour
- Complete replacement: each request overwrites the entire record for that primary key.
- Omitted fields are deleted. To keep existing data, send the full record.
- New fields are added whenever you include them; if you only send a subset, you’ll add those fields and remove anything omitted.
-
Choose the right endpoint
- Update API (PUT): update only; returns 404 if the primary key doesn’t exist.
- Upload API (POST): upsert; creates the record if missing, updates it if it exists.
-
Safe workflow
- (Optional) Get structure:
GET /connections/{dc_uuid}/schema - Get current values:
POST /connections/{dc_uuid}/queryfor the keys you’ll change - Build a full record per key: change intended fields, keep the rest, add any new fields
- Send a small test batch before larger runs
- (Optional) Get structure:
For full request/response details, see the API reference: Update Data, Upload Data, Schema, Query.
Upload Data
For upload-based Data Connections, send CSV or JSON data to store in Optimove. See the API Reference for the POST /connections/{data_connection_uuid}/upload_data endpoint.
Example Use Case: Upload a CSV of customer profiles with fields like user_id, name, and email for weekly campaign targeting.
Query Data
Retrieve data from a Data Connection, either from uploaded files or an external API. Use the API as detailed in the API Reference for the POST /connections/{data_connection_uuid}/query endpoint.
Example Use Case: Query an API-based Data Connection to fetch real-time product availability for a personalized email campaign.
Note: Although querying to ensure the data is present is an option, Optimove performs those checks for you during data retrieval.
Advanced Operations
The Data Connections API supports additional features, such as:
- Schema Retrieval: View the structure of a Data Connection’s data. See the API Reference for the
GET /connections/{data_connection_uuid}/schemaendpoint. - References Management: Link Data Connections to other resources (e.g., mail, SMS). Check the API Reference for endpoints like
POST /connections/{data_connection_uuid}/references. - Emarsys Integration: Perform external content lookups for Emarsys campaigns. Refer to the API Reference for the
POST /connections/{data_connection_uuid}/external-content/emarsysendpoint. - Batch Queries: Query multiple records efficiently. See the API Reference for the
POST /connections/{data_connection_uuid}/api_batch_queryendpoint.
Troubleshooting
Common issues and solutions:
- Authentication Error (422): Verify your
x-api-keyandx-brand-keyare correct and not expired. Retrieve new keys from the Optimove Personalize UI. - Connection Fails: Ensure the external API URL is accessible and supports the specified HTTP method (e.g., GET, POST).
- Data Not Found: Confirm the
data_connection_uuidis valid and the data has been uploaded or the external API is responding.
Further Reading
- API Reference: Full details on all Data Connections API endpoints.
- Optimove Academy: Data Connections: Explore tutorials and best practices.
Updated 3 days ago