
Integrate your Service with Optimove
Overview
Integrate with Optimove to automate customer marketing campaigns through various channels like email, SMS, push notifications, ad networks, and in-app/on-site messaging systems. This document provides instructions for integrating with Optimove, referring to your service as the integration partner. Optimove offers a comprehensive Web services API for seamless data exchange with Optimove's backend, enabling automated campaign execution via your platform.
In this article we will cover the following topics
- Scheduled Campaign Integration SDK Flow
- Scheduled Campaigns Integration API Flow
- Triggered Campaigns Integration Flow
- Event Listener Issue Notifications
- Managing Third-Party Subscriptions in Optimove
How the Integration Process Works
The following provides a detailed overview of the Scheduled Campaign Integration SDK Flow. This process enables your service to act as an execution channel for scheduled campaigns (e.g., weekly newsletters, daily promotional offers) that marketers build and plan within Optimove.
This flow covers all scheduled campaign use cases and is also the standard method for integrating external promotion systems, as promotion details are passed from Optimove to your service as part of the campaign payload.
The diagram below illustrates the complete process, from initial setup to campaign execution and metric reporting. The subsequent sections detail each of these flows.
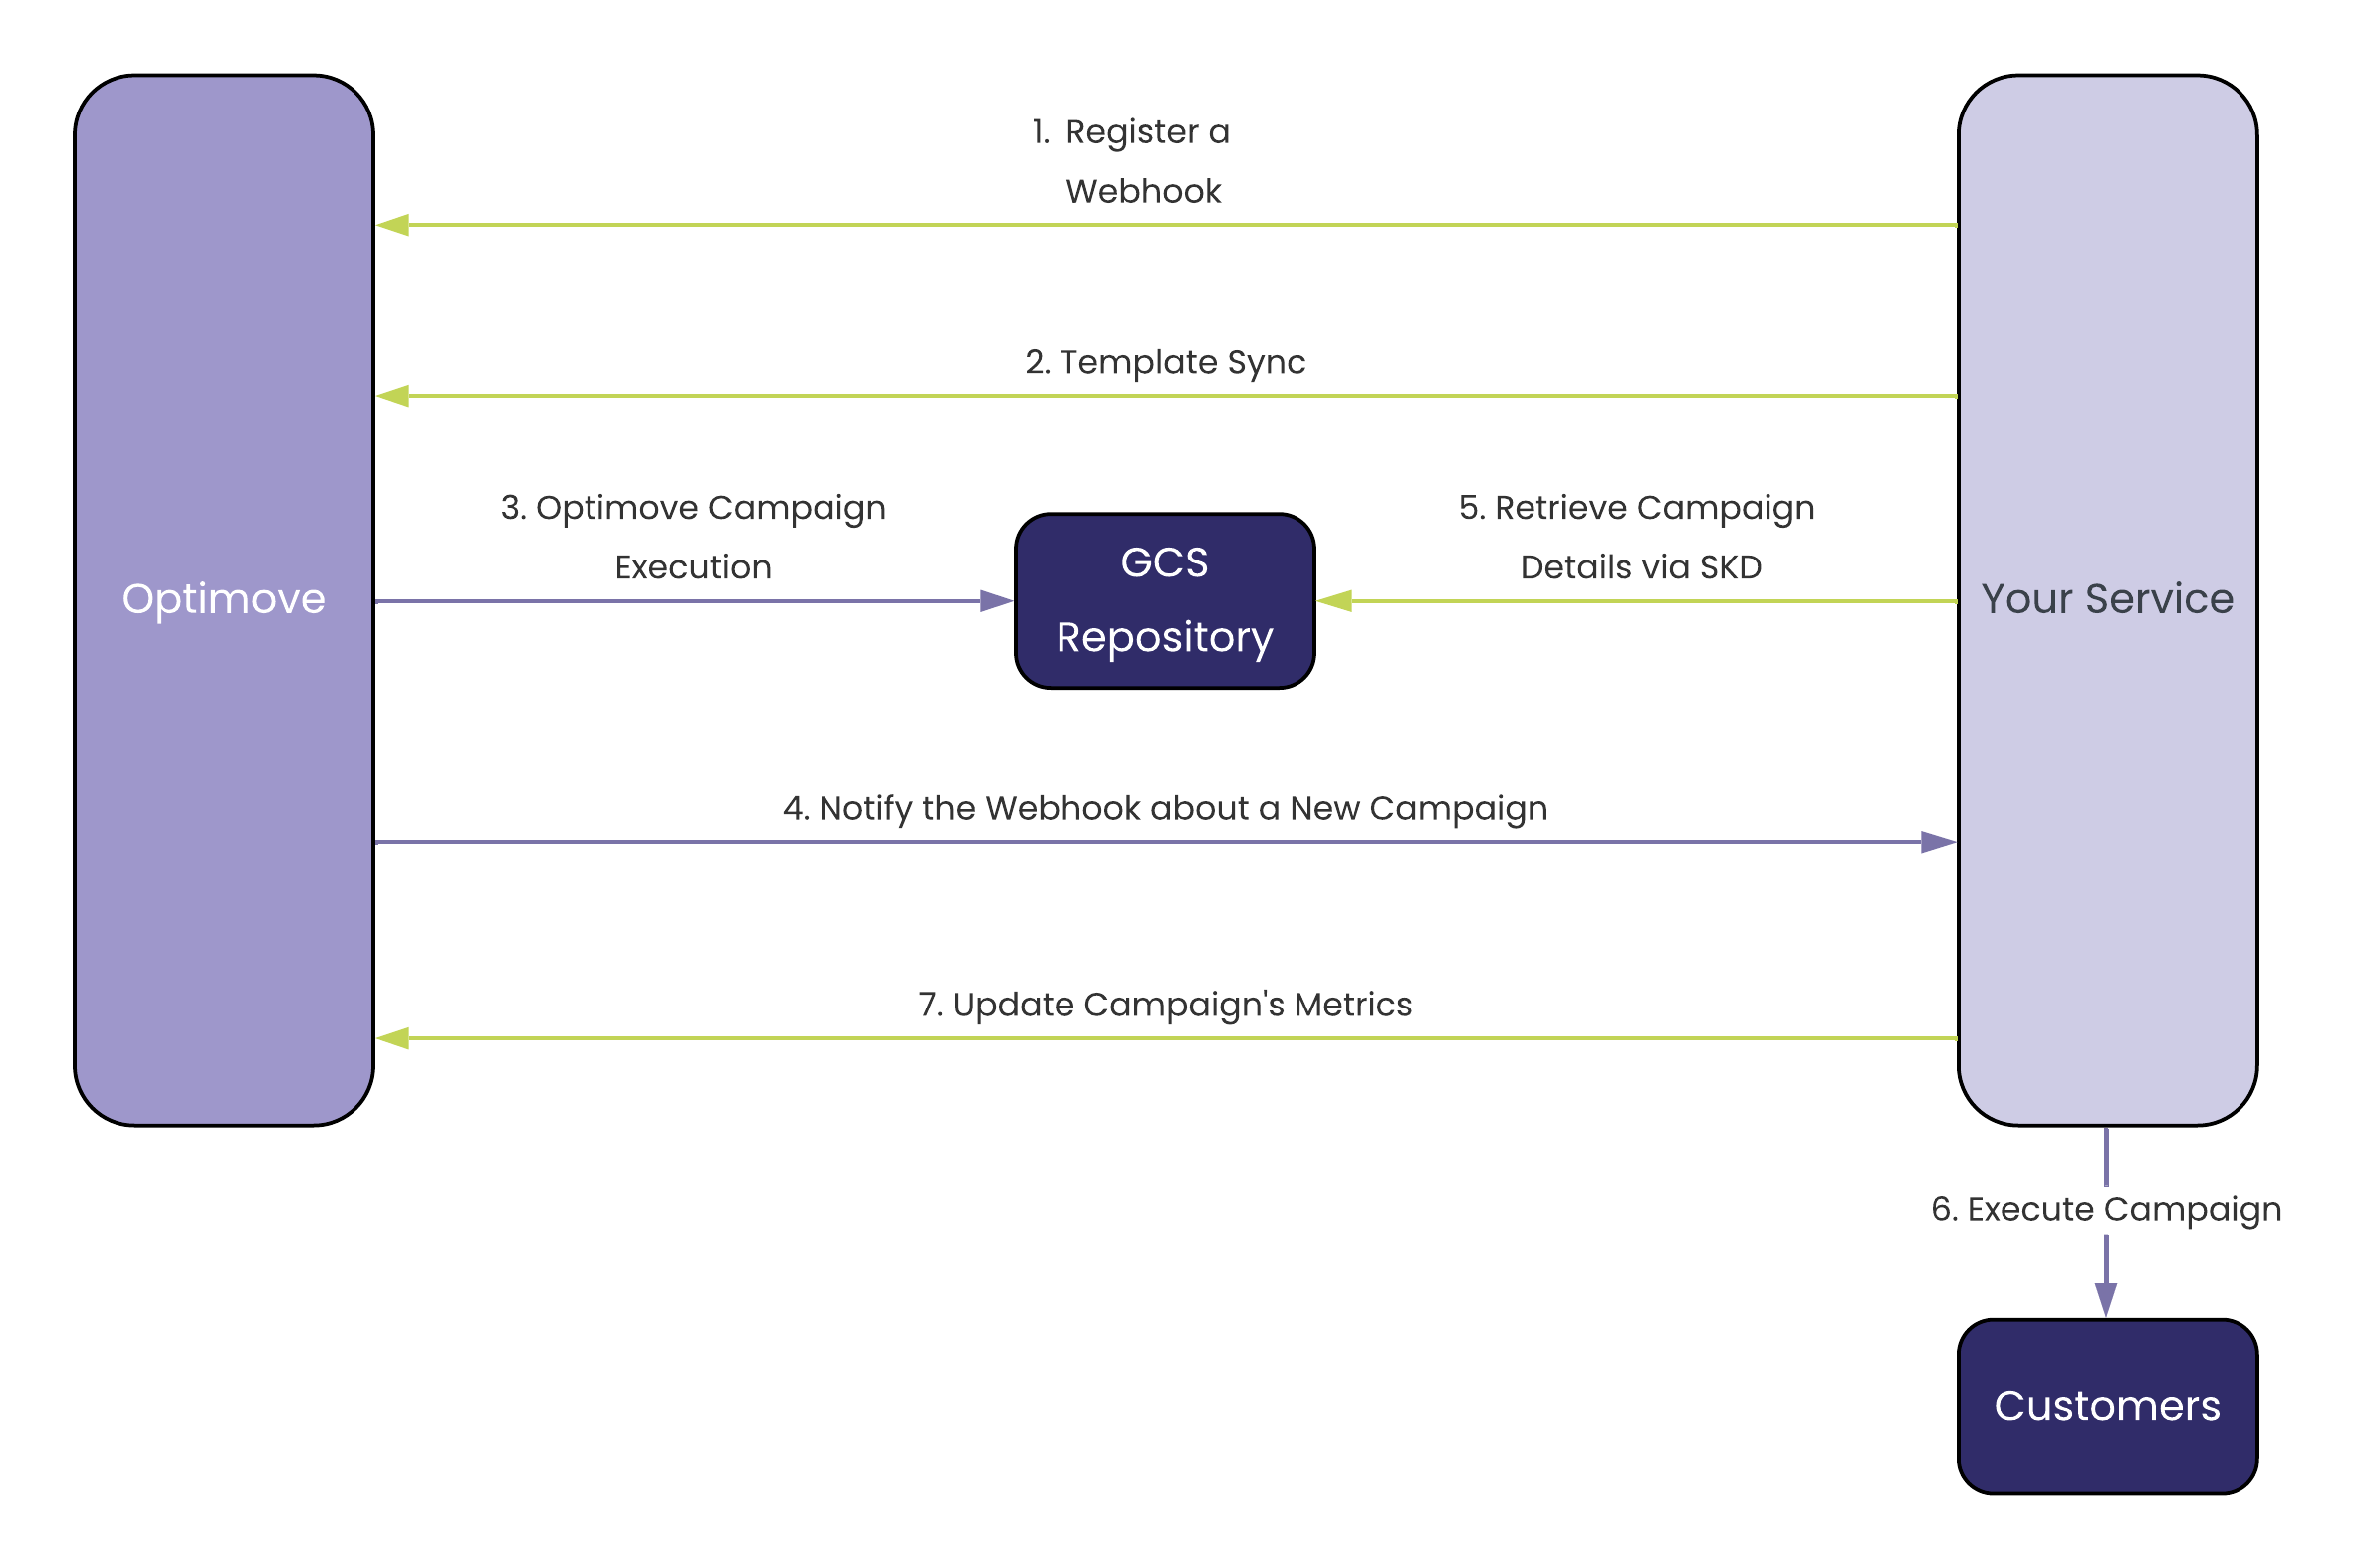
To initiate the process, your system must be able to receive notifications from Optimove. You will need to deploy a "listener" (a webhook) and register it within the Optimove UI. This registration is done in your Optimove site under Webhook Configuration.
This is a one-time setup for each execution channel.
Webhook Configuration Settings:
- Webhook Name: A unique name for your webhook.
- Webhook URL: The endpoint URL of your listener, which must be validated.
- File Size (10K-100K): The maximum size (in rows) of the campaign's customer files.
- Channel Name: The channel this webhook is associated with.
- Customer Attributes (Optional): Select any customer attributes you want included in the campaign files for personalization.
- Identifier (Optional): An attribute to be used as the primary customer identifier instead of the default Customer ID.
Once registered, Optimove will send an HTTP request with event type 14 to this URL whenever a new campaign is ready for execution, notifying your listener. The notification payload contains campaign details, which are described in Flow 5. Note that notifications are sent per channel template, per campaign.
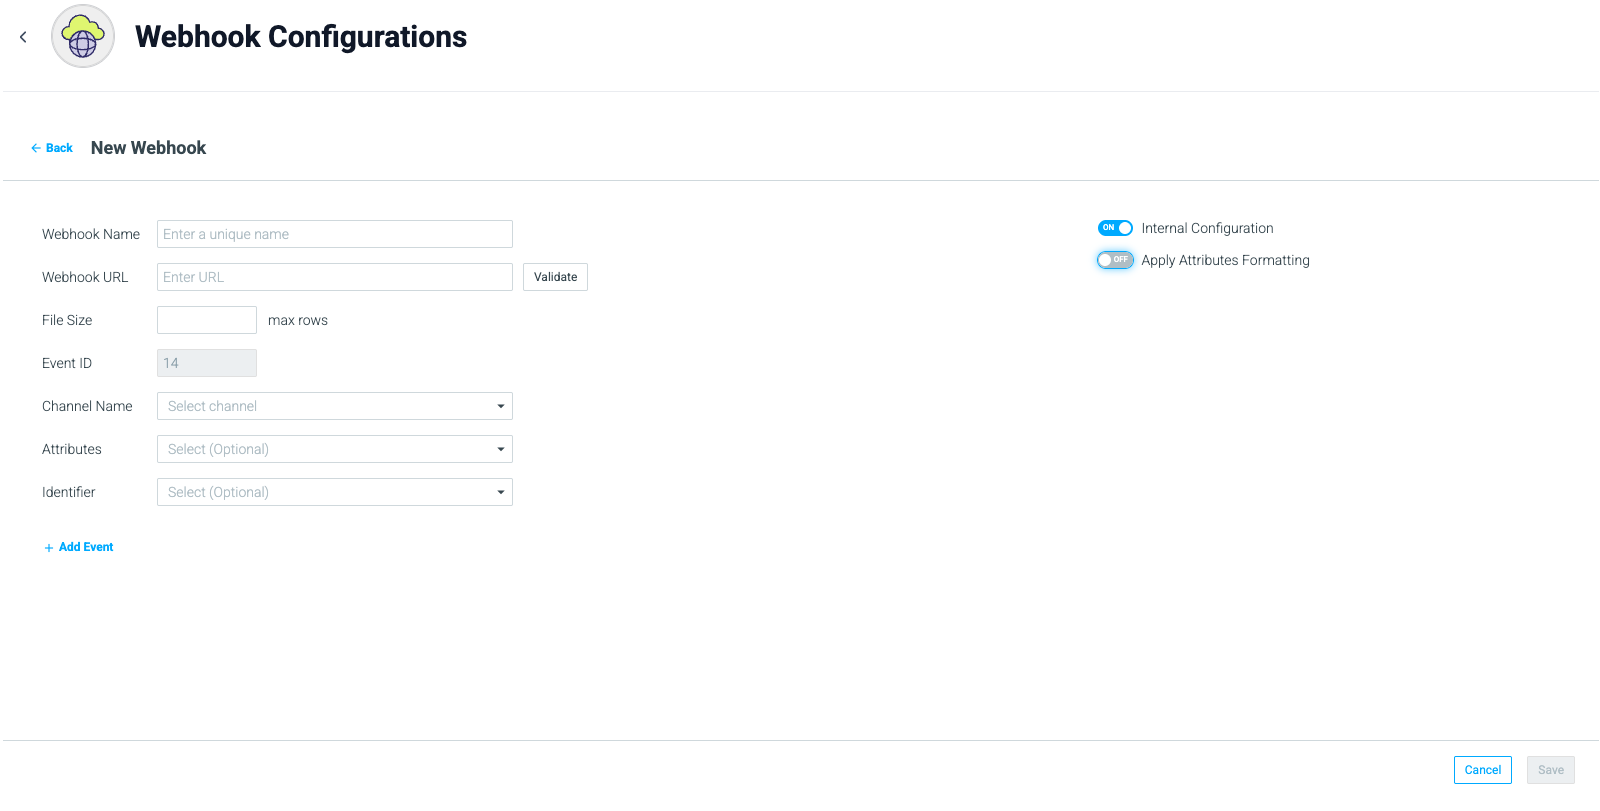
Note: If 'Apply Attributes Formatting' is selected, attribute values will be formatted based on the site configuration, i.e. 1.01$ instead of 1.01847$
Tip: To be alerted when this listener fails, see Event Listener Issue Notifications.
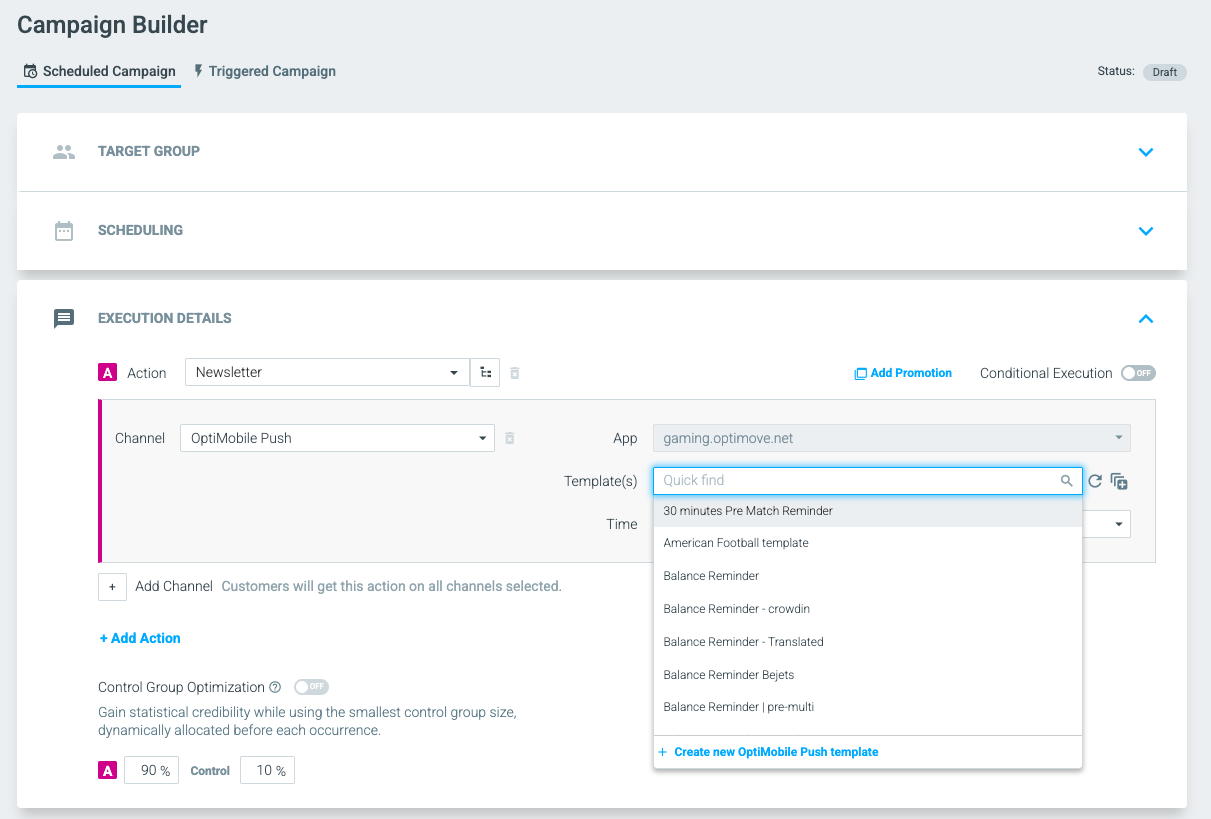
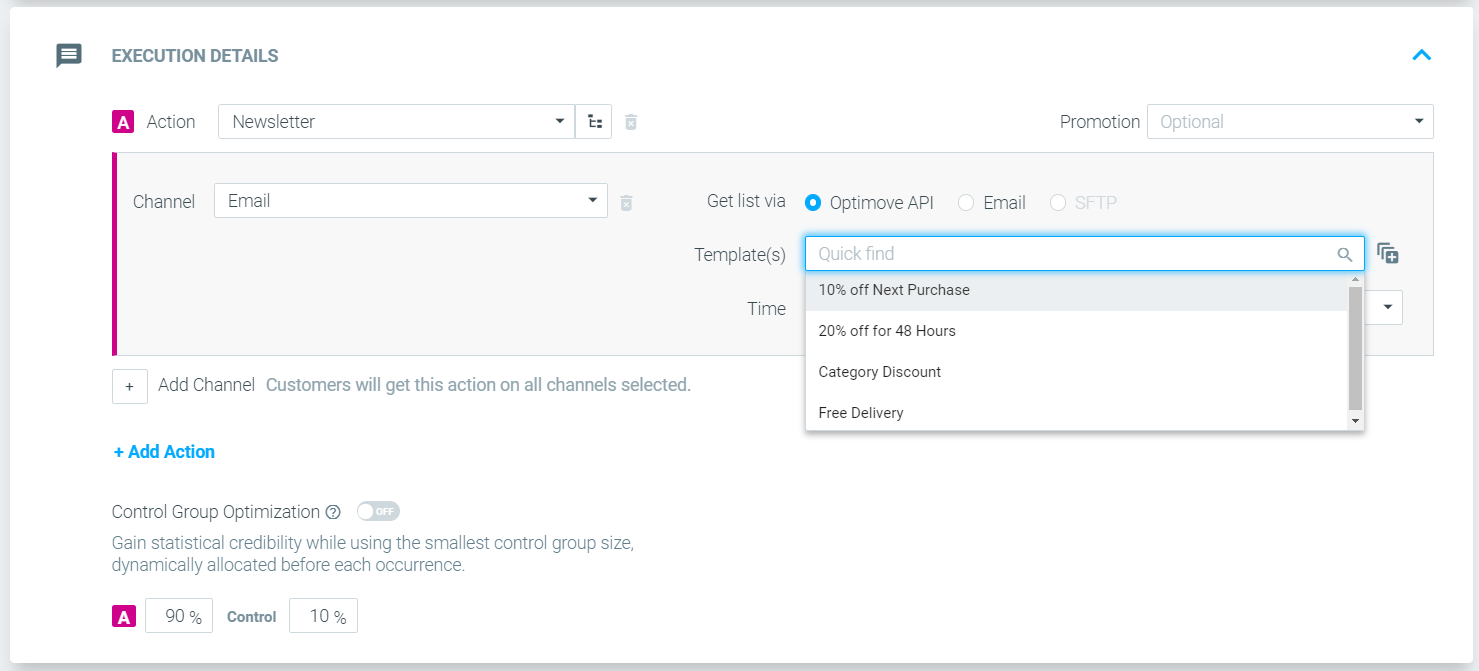
For marketers to use your system's templates within the Optimove UI, you must synchronize them via API. Your service will provide Optimove with key-value pairs that point to the content in your system (e.g., an HTML template for email or the text for an SMS message).
The following API calls are used to manage your templates within Optimove:
AddChannelTemplates: Provides Optimove with the names and IDs of new templates available for selection. Read more.DeleteChannelTemplates: Removes previously-added templates. Read more.GetChannelTemplates: Retrieves an array of all defined template IDs and their associated names. Read more.
Once added, marketers can select these templates directly from the Execution Details section in Optimove's Campaign Builder.
ImportantYour system must call the appropriate API function (
AddChannelTemplates,DeleteChannelTemplates) every time a template is added, deleted, or has its name changed. This ensures the list available to marketers in Optimove is always accurate and up-to-date.
This flow represents the marketer's action within Optimove. They set up a campaign using the campaign builder and select the relevant execution channels (i.e., your service). For a detailed guide on this process, refer to the Optimove documentation.
When a campaign begins execution, Optimove uploads the campaign's files to a secure bucket in Google Cloud Storage.
Each campaign upload consists of:
- A Metadata File: This file contains campaign data, including
Campaign Plan ID,Campaign ID,Scheduled Time,Channel Name,Template ID,Number of Files,Number of Customers, andPromotions, among other details. - Encrypted Customer Files: These files contain the
Customer IDfor each customer in the campaign, as well as any optional Customer Attributes you selected during the webhook configuration (Flow 1) for personalization.
These files are available for 7 days before they are automatically deleted. Access to these files is managed via the SDK, as described in Flow 6.
Immediately after the campaign files are prepared and uploaded to GCS, Optimove notifies your registered listener. This notification is the Event Type 14 HTTP request mentioned in Flow 1. It provides the campaign details and access keys your service needs to retrieve the files.
Payload Example:
{
  "EventTypeID": 14,
  "TimeStamp": "2022-06-29 11:45",
  "CampaignID": 4972,
  "EngagementID": 5066,
  "TenantID": 593,
  "BucketName": "optigration-external-eu",
  "CustomersFolderPath": "2022-06-29 11 46 xxxxx in-app 427 5066/customers",
  "MetadataFilePath": "2022-06-29 11 46 xxxx in-app 427 5066/metadata_5066",
  "DecryptionKey": "cM76THILPNevN7YzFQTNnzCLu7f3+YHet8eC20QrloM=1",
  "ChannelID": 489
}Optimove provides the Optimove Engager Integration SDK as a NuGet package to simplify data retrieval. This SDK is the required method for accessing the campaign customers and personalization data from the GCS bucket.
Working with the SDK involves two steps:
- Initialization: Create an SDK instance, providing it with the JSON payload received by your listener (from Flow 5). This payload contains all the necessary details to access the data, including the unique
DecryptionKey, as all data is encrypted. - Data Retrieval: Use the SDK instance's methods to retrieve:
- Metadata: Campaign details like
Campaign ID,Number of customers, etc. - Customers: Customer data, which is retrieved in batches.
The SDK encapsulates all the functionality for data retrieval, so you do not need to develop this directly.
SDK GitHub Link
- Metadata: Campaign details like
This step occurs entirely within your system. Using the data retrieved via the SDK, your system is responsible for executing the campaign at the Scheduled Time specified in the campaign's metadata file.
After your system has executed the campaign, you must push campaign delivery and response metrics back to Optimove. This is done using two key API calls:
UpdateCampaignMetrics- Read moreUpdateCampaignInteractions- Read more
To ensure data is displayed correctly in Optimove's campaign analysis and customer explorer reports, it is crucial to call bothUpdateCampaignMetricsandUpdateCampaignInteractionsseveral times a day for seven days following the execution of each campaign.
How the Integration Process Works
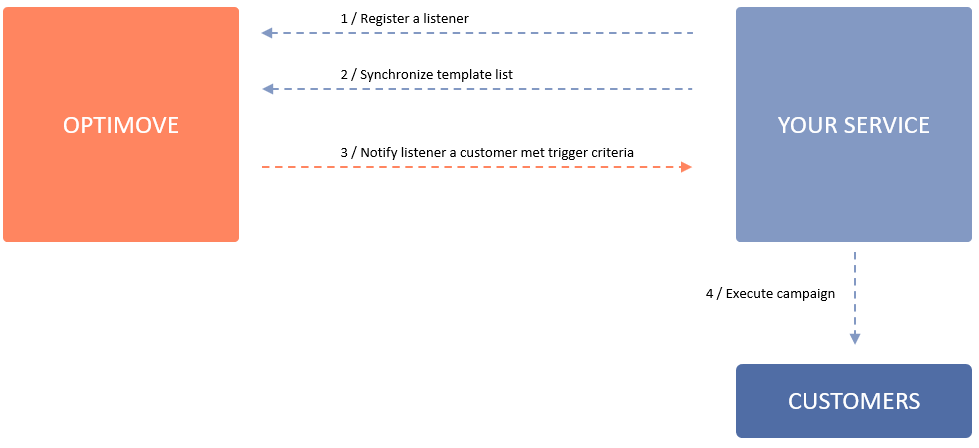
This diagram presents an overview of how information flows between Optimove and your service:
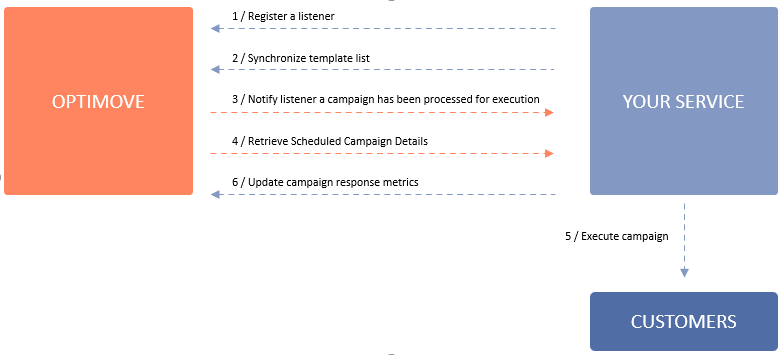
These depicted flows are detailed in the following sections.
Optimove notifies your system when a campaign is ready to be executed. To enable this, deploy a listener and register it with Optimove's REST API using the RegisterEventListener call. Once registered, Optimove will send an HTTP request with the campaign ID and event type whenever a new campaign is ready.
Register the URL of your service using the RegisterEventListener API call.
This only needs to be done once unless you wish to change the address of your service endpoint and/or register additional routes for other execution channels.
Once your listener is registered, Optimove will notify it any time a new campaign is ready by sending an HTTP request with a payload containing the campaign ID and the event type.
Tip: To be alerted when this listener fails, see Event Listener Issue Notifications.
Sync your available templates with Optimove's UI by providing the key-value pairs via API. These pairs should reference the content in your system, such as HTML templates for emails or text content for SMS messages.
The API calls used to manage the templates available for use within Optimove are:
- AddChannelTemplates – Provides Optimove with the names and IDs of templates that will be available for selection by marketers when scheduling a campaign to be executed by your service
- DeleteChannelTemplates – Removes previously-added templates
- GetChannelTemplates – Retrieves an array of all defined template IDs and associated names
Once templates are added to Optimove, marketers can select them in Optimove's Campaign Builder when setting up a campaign that will be executed via your service:
Important note: Your system should call the appropriate API function(s) every time that a new template is added, a template is deleted or a template's name has been changed. This will ensure that the list available to marketers within Optimove is always accurate and up to date.
As soon as Optimove has completed preparing each new campaign, it will notify your registered listener and provide the campaign's ID.
Retrieve campaign details for the received campaign ID by calling the GetCustomerSendDetailsByChannel API. Provide the designated channel ID from Optimove and the campaign ID received by your listener. For large campaigns, implement the API's paging mechanism to receive all customer IDs. Adjust campaign send times to your locale if needed, as Optimove returns them in UTC (GMT).
This step occurs within your system and does not involve Optimove. Your system should execute each campaign according to the campaign details received by your system from Optimove.
Push campaign delivery and response metrics to Optimove using the UpdateCampaignMetrics and UpdateCampaignInteractions API calls after executing a campaign. To ensure accurate display in Optimove's reports, make these calls multiple times a day for seven days after campaign execution.
Important Notes about the Integration Process
- Push notification apps – If your service generates push notifications, your system can differentiate between apps by adding app IDs and associated app names that will appear in the Optimove UI for selection by marketers.
- Personalization tags – Your system may retrieve additional attributes that can be used to personalize the content of each individual customer's communications (e.g., first name, account balance). In order to implement this capability, you and the client should agree on the attributes to be supported and then provide a list of the attribute names to the Optimove integration team.
FAQs
- If my system requires a different matching attribute, such as email or phone number, can we receive it from the Optimove API?
In our experience, the client usually provides this information directly to you. In some cases, the client decides to store this information within Optimove, in which case your system can retrieve it as a CustomerAttribute (see Personalization tags, above). - Can GetCustomerSendDetailsByChannel sometimes return different template IDs and/or send times for different customer IDs?
Yes. Because marketers can define multiple template conditions, different template IDs and/or send times may be associated with different customers within a single campaign. - Is it possible to register different listeners for different execution channels?
Yes. If, for example, your service handles both SMS and email, you can register a separate listener for each channel and they will not interfere with each other.
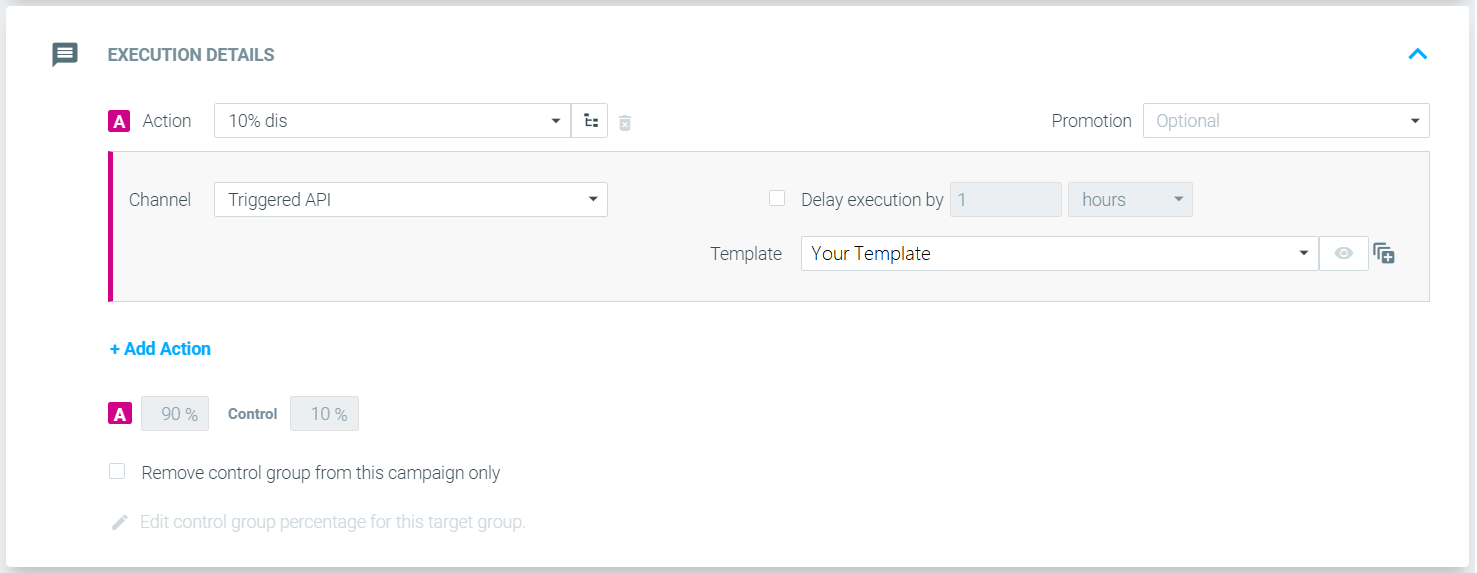
Within Optimove, a real-time triggered campaign is executed when a customer meets the defined Trigger criteria. The Trigger criteria are made up of one or more real-time events.
Example: The Trigger for a campaign is defined as visiting a specific webpage 3 times (3 webpage visit events). When a customer visits the webpage above 3 times, the Trigger criteria will have been met, and a campaign should be executed.
How the Integration Process Works
This diagram presents an overview of how information flows between Optimove and your service for the purpose of sending real-time triggered campaigns:
These depicted flows are detailed in the following sections.
Whenever Optimove detects that a customer met the Trigger criteria, Optimove will notify your system so that you can execute a campaign. For this purpose, you will need to deploy a "listener" and register it with the Optimove REST API.
Register the URL of your service using the RegisterEventListener API call with EventTypeID = 11 to a dedicated channel ID. This only needs to be done once unless you wish to change the address of your service endpoint and/or register additional routes for other execution channels.
Once your listener is registered, Optimove will notify it any time a customer meets the Trigger criteria by sending an HTTP request with a payload containing the campaign and customer details.
Tip: To be alerted when this listener fails, see Event Listener Issue Notifications.
In order for the templates available in your system to be selectable by marketers when creating campaigns within the Optimove UI, the list of available templates must be synchronized between your service and Optimove via API. In other words, your service will provide the Optimove API with the key-value pairs that point to the content in your system (for example, the HTML template for emails or the text content of SMS messages).
The API calls used to manage the templates available for use within Optimove are:
- AddChannelTemplates – Provides Optimove with the names and IDs of templates that will be available for selection by marketers when scheduling a campaign to be executed by your service
- DeleteChannelTemplates – Removes previously-added templates
- GetChannelTemplates – Retrieves an array of all defined template IDs and associated names
Once templates are added to Optimove, marketers can select them in Optimove's Campaign Builder when setting up a campaign that will be executed via your service.
Important note: Your system should call the appropriate API function(s) every time a new template is added, a template is deleted or a template's name has been changed. This will ensure that the list available to marketers within Optimove is always accurate and up to date.
As soon as Optimove has detected that a customer has met the Trigger criteria, an HTTP request will be sent with a payload containing the campaign and customer details. The API payload you will receive in real-time is described in RegisterEventListener under "EventTypeID = 11".
The payload contains the trigger name and, among other information, the customer, campaign, action, channel, and template IDs, including the relevant Personalization keys and values.
Important note: By default, any attribute defined as a personalization tag, as well as all the event and parameter values related to the trigger, will be sent as part of the payload for personalization purposes. To exclude one or more personalization tags and parameter values for a certain channel, please contact your CSM.
This step occurs within your system and does not involve Optimove. Your system should execute each campaign immediately upon receiving the campaign details from your system Optimove.
Important Notes about the Integration Process
- This integration flow supports Optimove clients who have Optimove's Real-Time Triggers add-on products.
- Client credentials – The code you develop to interface with Optimove via the API must utilize a different set of credentials for each individual client.
- Please contact the Product Integration Team to provide the exact Channel ID you should register the real-time listener (RegisterEventListener) and synchronize your templates to (AddChannelTemplates #2 above).
FAQs
- Is it possible to register different listeners for different execution channels?
Yes. If, for example, your service handles both SMS and email, you can register a separate listener for each channel, and they will not interfere with each other. - If my system requires a different matching attribute, such as email or phone number, can we receive it from event type 11?
Typically, the client provides this information directly to you. Some clients decide to store this information within Optimove, in which case, if the customer has configured this information as a personalization tag, your system can retrieve it from the "personalization" object within event type 11.
Optimove can automatically notify you when one of your registered event listeners encounters an issue, allowing you to detect and resolve problems before they impact campaign execution.
What Triggers a Notification
A notification is sent when a listener fails due to any of the following:
- Error response (e.g., 403, 404, or other non-2xx status codes)
- Timeout (listener unavailable)
- Broken or unreachable URL
- Rate limit reached (429)
Notifications are sent on the first detected failure for a given listener, then throttled to once every 10 minutes per listener. Each notification includes the event type, listener URL, and error details.
Supported Event Types: 1, 5, 11, 13, 14, 18, and triggered conditional execution notifications.
How to Register
- In Optimove, go to Settings → System Notifications.
- Click + Add System Notification.
- Select Identified issues with event listeners from the dropdown.
- Enter the recipient email address(es).
- Click Save.
Optimove supports three ways third-party platforms can share customer opt-in statuses.
Real-time API calls
You can use two real-time APIs calls to share your customer subscription data with Optimove.
As a first step, you will need to call the AddCustomerAttribute API to create the attributes as you would like to see them in your Optimove instance (e.g., Mobile Push Opt-in).
The second step is to populate that attributes for all customers, using the UpdateCustomerAttributes API (note there is a limit of 10,000 customers per call).
Important note: In order to use this option, you will need to have an API user with client permissions for your Optimove instance.
Designated API call for a specific channel
You can upload a list of customers and their opt-in status using the SetCustomerChannelPreference API (note there is a limit of 50,000 customers per call).
This API will populate a table in Optimove's backend which will then be used to create an opt-in status attribute.
When using this setup you will need to work with your CSM to have the new attribute created for you.
Batch process sent to Optimove
You can share this data as part of your batch process, either as an opt-in column within your "customers" table or as a separate standalone file of subscription users.
Updated about 14 hours ago