
Walkthrough example for an Upload Data Connection
This walkthrough guides you through setting up a Data Connection and uploading data to power personalized campaigns in Optimove. Whether you're integrating customer profiles or product data, this example helps you get started with the Optimove Personalize API. Follow along to create a Data Connection and upload data efficiently using a Python script or direct API calls.
Prerequisites
Before you begin, ensure you have:
- An Optimove Personalize account with access to API keys (
x-api-keyandx-brand-key). - cURL installed (available on most systems or via curl.se/download).
- Python 3.x installed (download from python.org) with the
requestslibrary (pip install requests). - A CSV file (e.g.,
data.csv) with columns matching theprimary_key(e.g.,user_id) and additional fields (e.g.,value).
Note: Replace****in examples with your actualx-api-keyandx-brand-keyvalues.
Create the Data Connection
Set up a new Data Connection using the POST /connections endpoint. Retrieve your x-api-key and x-brand-key from the Optimove Personalize Developer Tools.
Example: Create Data Connection
curl --location 'https://api.opti-x.optimove.net/api/data-connections/v1/connections' \
--header 'x-api-key: ****' \
--header 'x-brand-key: ****' \
--header 'Content-Type: application/json' \
--data '{
    "name": "New Test DC",
    "primary_key": "user_id",
    "description": "."
}'
Response
The API returns a data_connection_uuid, which you’ll use for uploads. Example:
{
    "data_connection_uuid": "34f8cfca-85fa-444f-97b2-a5b8cbff6907"
}
Figure 1: Workflow for creating a Data Connection.
Upload Data to the Data Connection
Upload data to your Data Connection using a Python script or direct API calls. The process handles batches of up to 5000 records automatically.
Note: Update and Upload share the same complete‑replacement behaviour (fields you don’t send are removed). Please review the Safe Usage Guidelines before running updates.
Upload Data via Python Script
Use this method if you have a CSV file (e.g., data.csv) with columns user_id and value. The script batches uploads to stay within the 5000-record limit.
Setup
- Install the
requestslibrary:pip install requests. - Save the script as
upload_data_to_dc.py. - Set environment variables:
API_KEY=<your-x-api-key> BRAND_KEY=<your-x-brand-key> DC_ID=<your-data-connection-uuid>.
Example Command
API_KEY=*** BRAND_KEY=*** DC_ID=34f8cfca-85fa-444f-97b2-a5b8cbff6907 python upload_data_to_dc.pyPython Script
# usage: API_KEY=<x-api-key> BRAND_KEY=<x-brand-key> DC_ID=<data-connection-uuid> python upload_data_to_dc.py

import csv
import requests
import os

CSV_FILE_PATH = "data.csv"
DC_ID = os.getenv("DC_ID")
API_ENDPOINT = f"https://api.opti-x.optimove.net/api/data-connections/v1/connections/{DC_ID}/upload_data"
MAX_BATCH_SIZE = 5000
HEADERS = {"x-api-key": os.getenv("API_KEY"), "x-brand-key": os.getenv("BRAND_KEY")}

def read_csv_data(file_path: str):
    with open(file_path, "r") as csvfile:
        reader = csv.DictReader(csvfile)
        return [row for row in reader]

def send_batch(batch: list[dict[str, str]]):
    payload = {
        "data": batch,
        "ttl_seconds": None,  # Optional: data does not expire if null
    }
    response = requests.post(API_ENDPOINT, json=payload, headers=HEADERS)
    if response.status_code == 200:
        print(f"Successfully uploaded batch of {len(batch)} records.")
    else:
        print(f"Failed to upload batch. Status code: {response.status_code}")
        print(f"Response: {response.text}")

def main():
    data = read_csv_data(CSV_FILE_PATH)
    total_records = len(data)
    batch_size = min(5000, MAX_BATCH_SIZE)
    print(f"Uploading {total_records} records")
    for i in range(0, total_records, batch_size):
        batch = data[i : i + batch_size]
        send_batch(batch)
    print(f"Finished uploading {total_records} records.")

if __name__ == "__main__":
    main()
Tip: Ensure yourdata.csvincludes a header row (e.g.,user_id,value) and matches theprimary_keydefined during Data Connection creation.
Direct Upload via API
For small datasets, upload directly using the POST /connections/{data_connection_uuid}/upload_data endpoint.
Note: Update and Upload share the same complete‑replacement behaviour (fields you don’t send are removed). Please review the Safe Usage Guidelines before running updates.
Example: Direct Upload
curl --location 'https://api.opti-x.optimove.net/api/data-connections/v1/connections/34f8cfca-85fa-444f-97b2-a5b8cbff6907/upload_data' \
--header 'x-api-key: ****' \
--header 'x-brand-key: ****' \
--header 'Content-Type: application/json' \
--data '{
    "data": [
        {
            "user_id": 1,
            "value": "xyz"
        }
    ]
}'
Warning: Exceeding 5000 records per request will cause a 400 error. Use the Python script or batching for larger datasets.
Use Case
Imagine you’re running an email campaign to recommend products based on customer purchase history. Upload a data.csv with user_id and purchase_amount to a Data Connection. Use a Data Connection Formula (e.g., DC_34f8cfca-85fa-444f-97b2-a5b8cbff6907:[%CUSTOMER_ID%]::purchase_amount:0) to fetch the amount and personalize the email with a tailored offer.
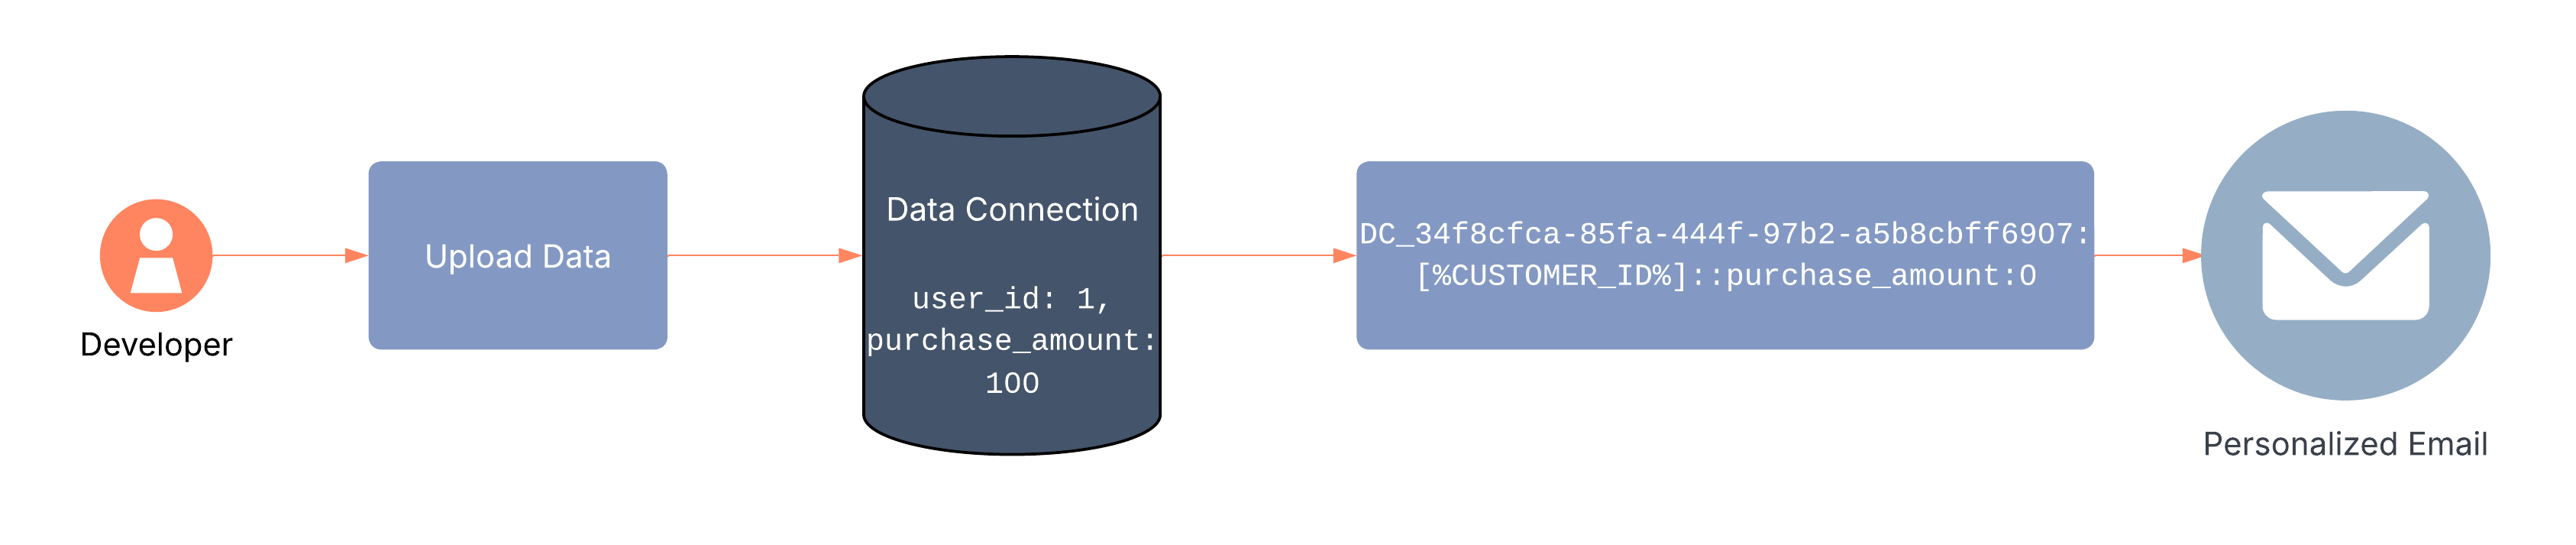
Figure 2: Using uploaded data for personalized email campaigns.
Troubleshooting
Common issues and solutions:
- Authentication Error (401): Verify your
x-api-keyandx-brand-keyare correct and not expired. Regenerate them from the Optimove Personalize UI. - Invalid JSON Format (400): Ensure the
dataarray contains objects with theprimary_key(user_id) and valid JSON syntax. Check for missing commas or brackets. - Exceeding 5000-Record Limit (400): Split large datasets into batches using the Python script or the
batch_uuidparameter in direct API calls.
Updated 4 days ago