OptiMobile
This integration guide will walk through a step by step integration, with checkpoints to test that the integration steps are complete and working.
At the end of the guide you should
- Have a mobile application with the Optimove SDK integrated
- Installs tracking into your Optimove UI
- Receive test push notifications directly to your device
Alternatively you can refer to the SDK Reference for a method-by-method explanation of the SDK's capabilities.
Repository Links
We offer the following SDKs to integrate into your mobile app, these are public and are hosted on GitHub.
Native SDKs
Cross-Platform SDKs
Prerequisites
Minimum iOS version: 10.0

Dependency Manager (optional)
- Xcode 11 or higher
- Cocoapods 1.5 or higher
- Carthage 0.30.0 or higher
Minimum Android API version: 21 (Lollipop) and higherNoneNone- iOS plugin installation requires CocoaPods. You can install CocoaPods
with the following command:
sudo gem install cocoapods
More information about CocoaPods can be found here: https://cocoapods.org/
- The plugin depends on Promises. Ensure you have a suitable promise
polyfill available in your app runtime if required.
You can find a suitable polyfill here: https://github.com/stefanpenner/es6-promise
Check the browser compatibility for Promises here: https://caniuse.com/#search=PromiseNoneVersioning
Optimove uses semantic versioning, which means that each time you update, Optimove SDK will
automatically get updated with any minor features, improvements, and hot-fixes.
Credentials
In order to initialize the SDK you must provide credentials which can be retrieved from the Settings section of
Optimove UI (Settings > OptiMobile > Mobile Push Config > App Keys). To gain access to this, please make a request to the Optimove Product Integration team.
Optimove Mobile integration can begin as soon as you have received access to the Optimove UI, however tracking custom events and Track and Trigger functions require configuration with the Optimove Product Integration team.
Depending on which features were enabled for your app you will be able to retrieve the following credentials:
OPTIMOVE_CREDENTIALS – Your unique SDK token in order to identify your Optimove tenant
OPTIMOVE_MOBILE_CREDENTIALS – The mobile config used to identify your app bundle
The SDK can be initialized with either credential depending on which features are to be used, or both. But at least one must be provided to initialize.
Integration
Supported PlatformsOur SDK supports both native and cross-platform development. For native platforms, it provides robust support for iOS (written in Swift) and Android (Java). Additionally, our SDK is compatible with cross-platform frameworks, including React Native, Flutter, Cordova, and Unity, ensuring a seamless integration experience across diverse app environments.
To add the SDK to your mobile app, follow the steps below:
/*
Contents:

1. Installation via SwiftPM
2. Installation via Cocoapods
3. Installation via Carthage
4. Setting up Capabilities


**************** 1. Installation via SwiftPM ****************

1. Open your Xcode project or workspace.
2. Add the https://github.com/optimove-tech/Optimove-SDK-iOS dependency with this instruction: https://developer.apple.com/documentation/xcode/adding_package_dependencies_to_your_app, and select:

   - OptimoveSDK
   - OptimoveNotificationServiceExtension


**************** 2. Installation via Cocoapods ****************

1. If you haven't already, use this guide to add Cocoapods to your project:
	https://guides.cocoapods.org/using/using-cocoapods.html#creating-a-new-xcode-project-with-cocoapods
2. Open your Podfile.
3. Locate your App's target declaration.
4. Update your Podfile with the example: */

platform :ios, '10.0'
   use_frameworks!

   target '<YOUR_APP_NAME>' do
       pod 'OptimoveCore'
       pod 'OptimoveSDK'
   end

   target '<YOUR_NOTIFICATION_SERVICE_EXTENSION_NAME>' do
       pod 'OptimoveCore'
       pod 'OptimoveNotificationServiceExtension'
   end

/*
5. From your terminal, run pod install

6. Cocoapods will generate a Workspace file (*.xcworkspace). Use this workspace file from now on.


**************** 3. Installation via Carthage ****************

1. If you haven't already, install Carthage: https://github.com/Carthage/Carthage#installing-carthage
2. Create or update a Cartfile:

   github "optimove-tech/Optimove-SDK-iOS"

3. Run carthage update.
4. Choose a target for adding Optimove in an Xcode project.
5. Add the SDK to "Frameworks, Libraries, and Embedded Content" by dragging the new components
from Carthage/Build/iOS, or selecting through the UI.

   Please, do not add OptimoveNotificationServiceExtension.framework to your Notification
   Service Extension. Instead, add this framework to the hosted/main app and double-check
   that LD_RUNPATH_SEARCH_PATHS of your Notification Service Extension contains
   @executable_path/../../Frameworks.

   An example list of the added dependencies: [Image: The list of frameworks]

6. Add a New Run Script Phase for the App target's Build Phases, name it Carthage.

   6.1. Add the shell script to the Carthage's copy-framework phase:

      /usr/local/bin/carthage copy-frameworks

7. On this step, you could use separated lines for input/output files, but for this tutorial,
we will describe a list file. Create .xcfilelist files according to steps 7.1 and 7.2.
Or use already prepared .xcfilelist files from the source:
https://github.com/optimove-tech/Optimove-SDK-iOS-Source-Code

   7.1. Add an input.xcfilelist file path under Input Files Lists. The file has to contain: */

   $(SRCROOT)/Carthage/Build/iOS/OptimoveCore.framework
   $(SRCROOT)/Carthage/Build/iOS/OptimoveSDK.framework
   $(SRCROOT)/Carthage/Build/iOS/OptimoveNotificationServiceExtension.framework

/*
   7.2. Add an output.xcfilelist file path under Output Files Lists. The file has to contain: */

   $(BUILT_PRODUCTS_DIR)/$(FRAMEWORKS_FOLDER_PATH)/OptimoveSDK.framework
   $(BUILT_PRODUCTS_DIR)/$(FRAMEWORKS_FOLDER_PATH)/OptimoveCore.framework
   $(BUILT_PRODUCTS_DIR)/$(FRAMEWORKS_FOLDER_PATH)/OptimoveNotificationServiceExtension.framework

/*
Important Note:
Use the "~>" operator to get the latest, backward-compatible, Optimove SDK seamlessly.
Every time you run "cart update," you'll get the latest stable version.


**************** 4. Setting up Capabilities ****************

IMPORTANT: If you're upgrading the Optimove iOS SDK from a version earlier than 3.3.0,
you must migrate from an AppGroup storage object to the shared defaults object by
following the SDK setup instructions. If you're installing or upgrading to version 3.3.0
or later, you can skip this section.

To set up the necessary capabilities, follow these steps in the Capabilities page for the
App Target of your main application:

1. Enable the Push Notifications capability.
2. Enable the Background Modes capability, and check both Remote notifications and Background fetch.
3. Enable the App Groups capability, and add the following group: group.\<YOUR_APP_BUNDLE_ID>.optimove.
*/
/***************** Configure build.gradle *****************
1. Add the following to the app module's build.gradle file, under the android object */
compileOptions {
sourceCompatibility JavaVersion.VERSION_1_8
targetCompatibility JavaVersion.VERSION_1_8
}
/*
2. For Kotlin support only:
Kotlin is completely interoperable with Java and Apps that are written in Kotlin can use the SDK.
However, these apps should add the following in addition to the compile options */
compileOptions {
sourceCompatibility JavaVersion.VERSION_1_8
targetCompatibility JavaVersion.VERSION_1_8
}
kotlinOptions {
jvmTarget = '1.8'
}
/*
If you get an error like :app:transformClassesWithDesugarForDebug, you may have to
enable desugaring in your gradle.properties file */
android.enableD8.desugaring = true
/******** Add the Optimove repository to Your Project ********
1. Make sure that you have the mavenCentral() repository in your project level build.gradle file */
buildscript {
repositories {
mavenCentral()
//...
}
//...
}
/*
2. In your app module's build.gradle file, update your dependency statement
(under dependencies object) to */
implementation 'com.optimove.android:optimove-android:7.+'
/*
If after adding the dependency you get an error building like "Manifest merger failed",
follow the steps below to adjust Automatic Backup.
******************** Automatic Backup ********************
Starting from Android SDK version 23, Android offers the Auto Backup for Apps feature
as a way to back up and restore the user's data in the app.
The Optimove SDK depends on various local files being deleted once the app is uninstalled.
For that reason, if the hosting app also defines android:fullBackupContent="@xml/app_backup_rules"
in the manifest.xml file, Android will raise a merge conflict.
Follow these steps to resolve the conflict and maintain the data integrity of the Optimove SDK:
- Add tools:replace="android:fullBackupContent" to the application tag.
- Copy the content of the optimove_backup_rules.xml to your full-backup-content xml.
If your target version is 31 and higher and your app defines
android:dataExtractionRules="@xml/app_backup_rules", follow the same steps above.
If you consume SDK version higher or equal to 4.2.0 and your target version is lower
than 31, add tools:remove="android:dataExtractionRules" to the application tag.
For more information about Android Automatic Backup, check out the backup
Developer's Guide at https://developer.android.com/guide/topics/data/autobackup.html.
/*npm install @optimove-inc/react-native
pod install --project-directory=ios//1. Add the following dependency to your pubspec.yaml
dependencies:
optimove_sdk_flutter: 1.0.0
//2. run:
pub install/* To add the Optimove Cordova plugin to your project use the following in the
root directory of your project. */
cordova plugin add @optimove-inc/cordova-sdk Optimove Unity SDK is distributed as a Unity package for importing into your projects.
https://github.com/optimove-tech/Optimove-SDK-Unity
This repository contains 3 folders:
1. Artifacts has everything necessary to integrate with Optimove Unity SDK. This includes Optimove.unitypackage and OptimoveNativeAssets~ required if integrating with iOS.
2. unity-sdk contains a Unity project used to create Optimove.unitypackage.
3. ExampleApp is an example project with imported Optimove.unitypackage. Check ExampleApp/README.md if you want to run it.
For integration:
1. Import Optimove.unitypackage into your Unity project.
2. Importing the package will add the OptimoveInit.cs script to the Assets folder. Add it to MainCamera.Initialization
If you know your credentials when application starts, your initialization should look as follows:
class AppDelegate: UIResponder, UIApplicationDelegate {
    func application(_ application: UIApplication, didFinishLaunchingWithOptions launchOptions: [UIApplicationLaunchOptionsKey: Any]?) -> Bool {
        let config = OptimoveConfigBuilder(
          optimoveCredentials: "<YOUR_OPTIMOVE_CREDENTIALS>",
          optimobileCredentials: "<YOUR_OPTIMOVE_MOBILE_CREDENTIALS>")
            .build()

        Optimove.initialize(with: config)
    }
}
public class YourApplication extends Application {
@Override
public void onCreate() {
super.onCreate();
Optimove.initialize(this, new OptimoveConfig.Builder(
"<YOUR_OPTIMOVE_CREDENTIALS>",
"<YOUR_OPTIMOVE_MOBILE_CREDENTIALS>"
).build());
}
}
/********************** Environments **********************
If you are using staging and prod environments, you will receive 2 different sets of credentials.
Consider using your BuildConfig file to declare them: */
buildTypes {
release {
...
buildConfigField "String", "OPTIMOVE_CREDENTIALS", '"<YOUR_OPTIMOVE_CREDENTIALS>"'
buildConfigField "String", "OPTIMOVE_MOBILE_CREDENTIALS", '"<YOUR_OPTIMOVE_MOBILE_CREDENTIALS>"'
}
stg {
...
buildConfigField "String", "OPTIMOVE_CREDENTIALS", '"<YOUR_OPTIMOVE_STAGING_CREDENTIALS>"'
buildConfigField "String", "OPTIMOVE_MOBILE_CREDENTIALS", '"<YOUR_OPTIMOVE_MOBILE_STAGING_CREDENTIALS>"'
}
}
// Then initialize Optimove using:
Optimove.initialize(this, new OptimoveConfig.Builder(
BuildConfig.OPTIMOVE_CREDENTIALS,
BuildConfig.OPTIMOVE_MOBILE_CREDENTIALS
).build());
/********************** Android **********************

Add the initialization code to your Application extending class onCreate method (usually
located in android/app/src/main/java/.../MainApplication.java): */

import com.optimove.android.OptimoveConfig;
import com.optimove.reactnative.OptimoveReactNativeConfig;
import com.optimove.reactnative.OptimoveReactNativeInitializer;


OptimoveReactNativeInitializer.initializeOptimove(
    OptimoveReactNativeConfig.newInstance()
                                .optimoveCredentials("<YOUR OPTIMOVE CREDENTIALS>")
                                .optimobileCredentials("<YOUR OPTIMOBILE CREDENTIALS>")
                                .deeplinkEnabled(boolean)
                                // OptimoveConfig.InAppConsentStrategy.EXPLICIT_BY_USER | OptimoveConfig.InAppConsentStrategy.AUTO_ENROLL
                                .enableInAppWithConsentStrategy(OptimoveConfig.InAppConsentStrategy)
                                // Optionally change the notification small icon - .setPushSmallIconId(getApplicationInfo().icon)
                                .build(), getApplicationContext());


/************************ iOS ************************

In your ios/AppDelegate application:didFinishLaunchingWithOptions method */

// For Objective-C:

#import <OptimoveReactNative/OptimovReactNative-Bridging.h>
...
[OptimoveInitializer initialize:@"<YOUR OPTIMOVE CREDENTIALS>" optimobileCredentials:@"<YOUR OPTIMOBILE CREDENTIALS>" inAppConsentStrategy:@"auto-enroll|in-app-disabled|explicit-by-user" enableDeferredDeepLinking:BOOL];


// For Swift:

import OptimoveReactNative
...
OptimoveInitializer.initialize("<YOUR OPTIMOVE CREDENTIALS>", optimobileCredentials: "<YOUR OPTIMOBILE CREDENTIALS>", inAppConsentStrategy: "auto-enroll|in-app-disabled|explicit-by-user", enableDeferredDeepLinking: Bool)
// 1. Create an optimove.json file in your project's root directory with the following:
{
  "optimoveCredentials": "YOUR_OPTIMOVE_CREDENTIALS",
  "optimobileCredentials": "YOUR_OPTIMOVE_MOBILE_CREDENTIALS",
  "inAppConsentStrategy": "in-app-disabled|auto-enroll|explicit-by-user",
  "enableDeferredDeepLinking": false
}

// 2. Declare the asset in your pubspec.yaml:
assets:
  - optimove.json

// 3. In your Dart code, you can now import and use Optimove features:
import 'package:optimove_sdk_flutter/optimove.dart';
// 1. Create an optimove.json file in your project's root directory with the following content:
{
"optimoveCredentials": "YOUR_OPTIMOVE_CREDENTIALS",
"optimoveMobileCredentials": "YOUR_OPTIMOVE_MOBILE_CREDENTIALS",
"inAppConsentStrategy": "in-app-disabled|auto-enroll|explicit-by-user",
"enableDeferredDeepLinking": false
}
// 2. After you modify optimove.json, don't forget to run:
cordova prepare <platform>
// 3. Finally, if you are using TypeScript, please add the following to your tsconfig.json:
"files": ["./node_modules/@optimove-inc/cordova-sdk/index.d.ts"]
/********************** Android **********************
Optimove Cordova SDK requires compileSdkVersion 31. Apps created with Cordova 11 by default
depend on cordova-android@10.*, which sets the default compileSdkVersion to 30. If you are
getting related errors, you can: */
// 1. Override compileSdkVersion in config.xml:
<platform name="android">
<preference name="android-targetSdkVersion" value="31" />
</platform>
// 2. Upgrade the dependency:
cordova platform update [email protected]
/* Please note that the default Android toolchains have moved to JDK11 now.
You must use JDK11, at least if you change any of the Android API target versions to >=31.
### Other
(Optional) Optimove SDK includes Firebase Bill of Materials. You may override BoM
version by adding build-extras.gradle to platforms/android/app with the following content: */
ext {
// Optimove supports [19.0.0, 22.99.99] Firebase Messaging version range,
// which corresponds to [20.0.0, 28.99.99] Bill of Materials version range.
OptimoveFirebaseBoMVersion = "28.2.0"
}
/************************ iOS ************************
After you have added the plugin, run the following commands: */
cd app/platforms/ios
pod install
cordova prepare ios
/*
After first adding the iOS platform, you may need to open the project in
Xcode and fix any errors if present.
************** Typescript / Javascript **************
In either case, you don't need to import anything from the plugin module. Types are
available as ambient declarations. For example, in your www/js/index.js, you can
use the global Optimove object like this: */
document.addEventListener('deviceready', function () {
if (typeof Optimove === 'undefined') {
console.info('Optimove plugin not found');
return;
}
Optimove.setPushReceivedHandler(() => {});
}, false);// Create Assets/OptimoveConfigFiles/optimove.json file with the following content:
{
"optimoveCredentials": "YOUR_OPTIMOVE_CREDENTIALS",
"optimobileCredentials": "YOUR_OPTIMOVE_MOBILE_CREDENTIALS"
}
/********************** Android **********************
In Player Settings verify the following (it should be set automatically):
- Custom gradle main template set to Plugins/Android/mainTemplate.gradle
- Custom gradle launcher template set to Plugins/Android/launcherTemplate.gradle
- Custom gradle base template set to Plugins/Android/baseProjectTemplate.gradle
- Custom main manifest set to Plugins/Android/AndroidManifest.xml
- For 2020.3+ make sure the custom gradle properties template is set to Plugins/Android/gradleTemplate.properties
************************ iOS ************************
1. Move Artifacts/OptimoveNativeAssets~ from the Artifacts folder to the Assets/ folder.
The xcframeworks will be automatically added when the project is built.
2. Build the project. Verify that the New Build System in Xcode is enabled.
*********************** Usage ***********************
In your Unity code, you can now import and use Optimove features: */
using OptimoveSdk;
Delaying the initialization
In rare cases when you determine credentials dynamically, you can use delayed initialization. Currently, only the SDKs listed below support this feature.
let config = OptimoveConfigBuilder(region: .US, features: [.optimove, .optimobile]).build()
Optimove.initialize(with: config)

// time passes...

Optimove.setCredentials(optimoveCredentials: "OPTIMOVE_TOKEN", optimobileCredentials: "OPTIMOBILE_TOKEN")
public class YourApplication extends Application {
@Override
public void onCreate() {
super.onCreate();
OptimoveConfig.FeatureSet desiredFeatures = new OptimoveConfig.FeatureSet()
.withOptimobile()
.withOptimove();
Optimove.initialize(this, new OptimoveConfig.Builder(OptimoveConfig.Region.EU, desiredFeatures).build());
}
}
// time passes...
Optimove.setCredentials( "<YOUR_OPTIMOVE_CREDENTIALS>", "<YOUR_OPTIMOVE_MOBILE_CREDENTIALS>");
// After credentials are set, all caches are flushed and the SDK starts behaving identical to
the Standard Initialisation.You can retrieve the region and feature by contacting an Optimove CSM specialist.
Checking your installs
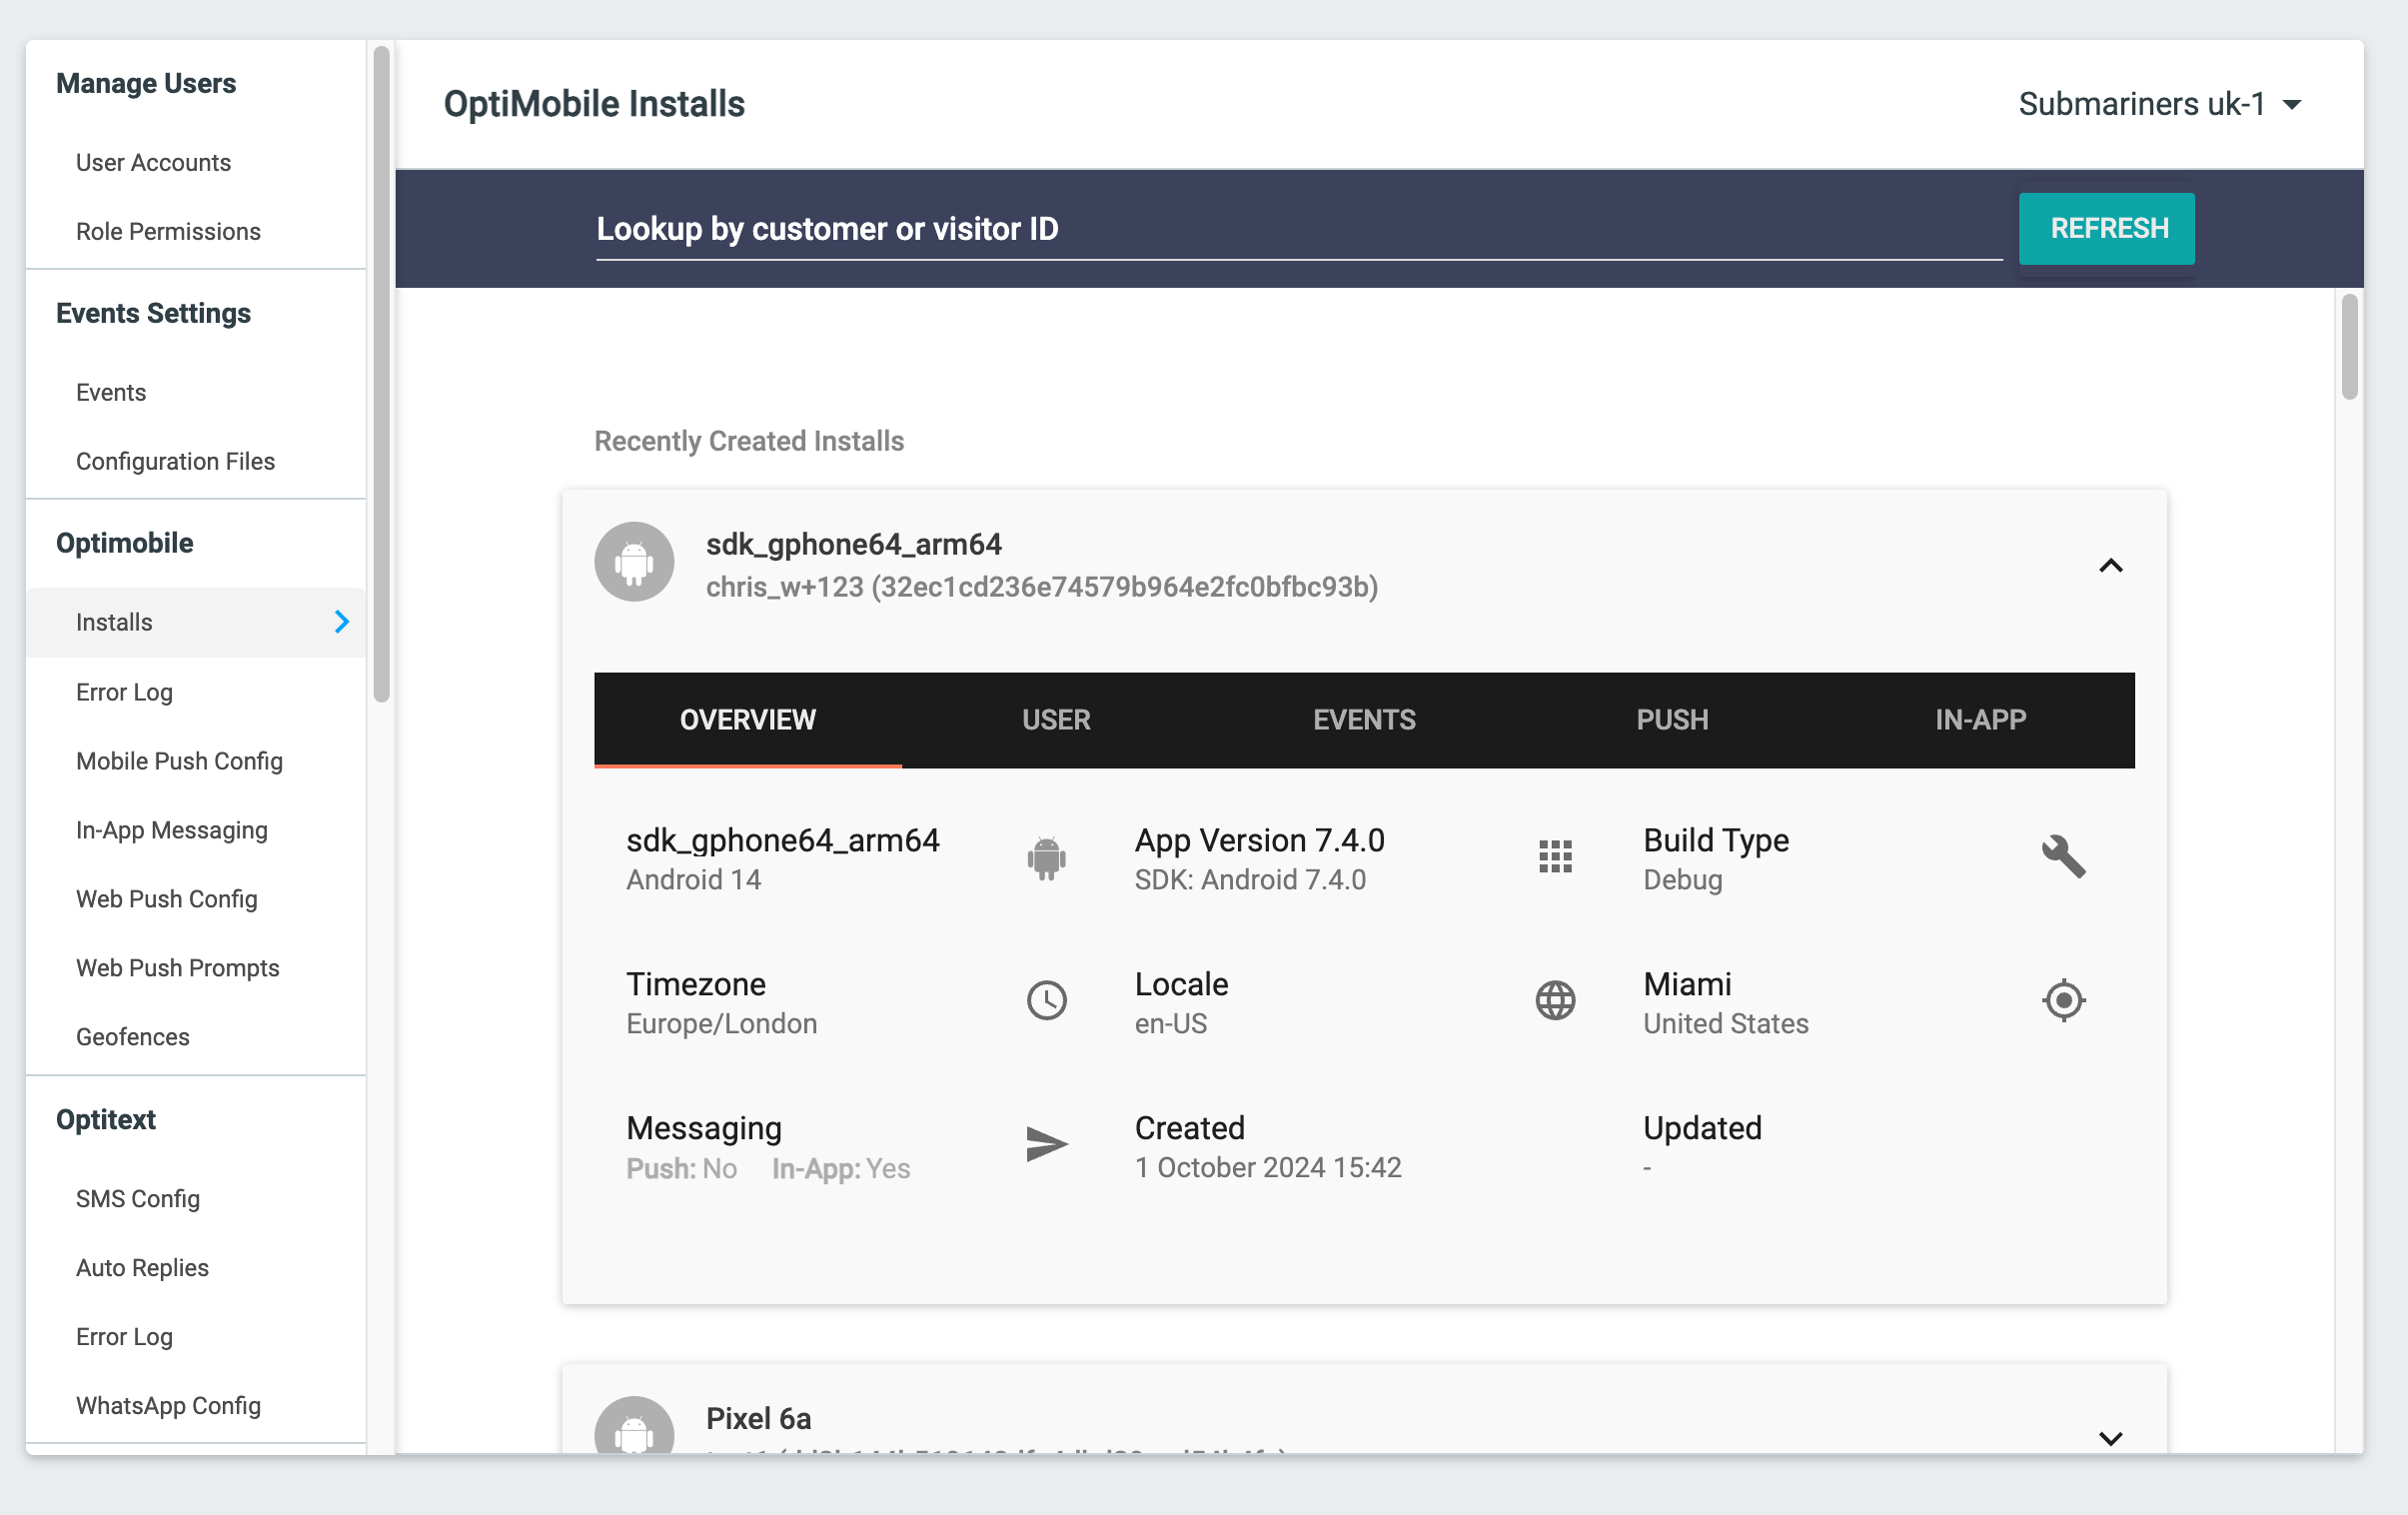
When you run your app on a simulator or install your app on a device, you can check that the SDK has been initialized correctly by selecting the app and clicking the Installs tab, found under OptiMobile in the Settings area, to see the most recent installs of your app. You should be able to see an install appear at the top of the page.
Push Notifications
Now that you have successfully integrated the SDK, you can add the ability to send push notifications to your customers.
To unlock this capability, you will need to have added Mobile Push Notifications to your Optimove package. If you can’t see this feature in your Optimove instance, contact your CSM to find out more.
Migrating from another third-party vendorIf you are migrating from another third-party vendor, you will need to swap out their SDK for our SDK. You will need to do this to obtain the device token for each customer. However, this will not cause the customer to be asked again to give permission for push notifications. If a customer has already given permission for push notifications, the Optimove SDK will automatically get the device token without asking the user again.
Configure Push Gateways
In order to send messages to users of your app, you must configure one or more messaging gateways, depending on your desired platform. For mobile push notifications, this will likely involve configuring the Apple Push Notification Service (APNS) and/or Firebase Cloud Messaging (FCM) and uploading your push certificates to Optimove.
Optimove UI
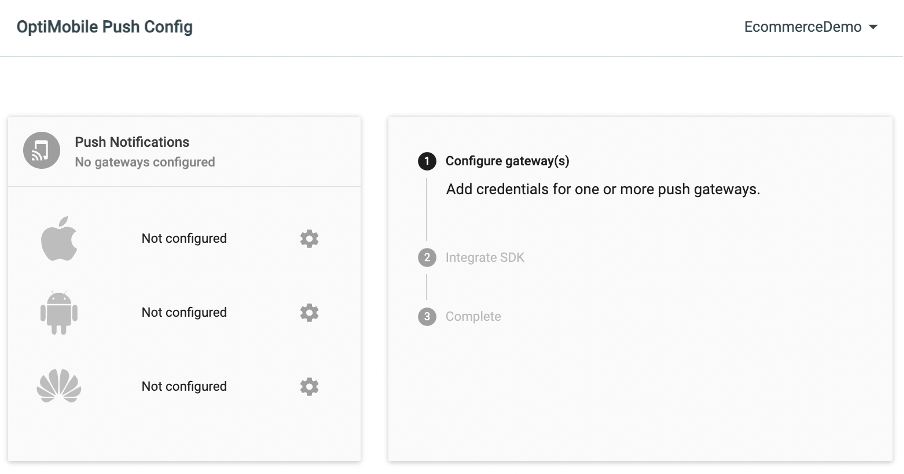
To begin configuring gateways, navigate to the Settings area of the site, scroll to OptiMobile, and select Mobile Push Config.
Click the cog icon next to the platform you would like to configure to open the dialog where you can enter the required information to send push notifications to iOS devices via APNS, Android devices via FCM, or Huawei devices via HCM.
APNs Configuration
To send push notifications to iOS devices with Optimove, you have to set up APNs credentials in your Apple Developer account and configure push.
In order to generate a P8 key for Apple services, access your account at https://developer.apple.com/ and select "Certificates, Identifiers & Profiles", then select "Keys" on the left.

Select "Create a Key" and on the form "Register a New Key" enter a meaningful name such as "APNS Access Key" and check the "Enable" checkbox for "Apple Push Notifications service (APNs)", click "Continue".
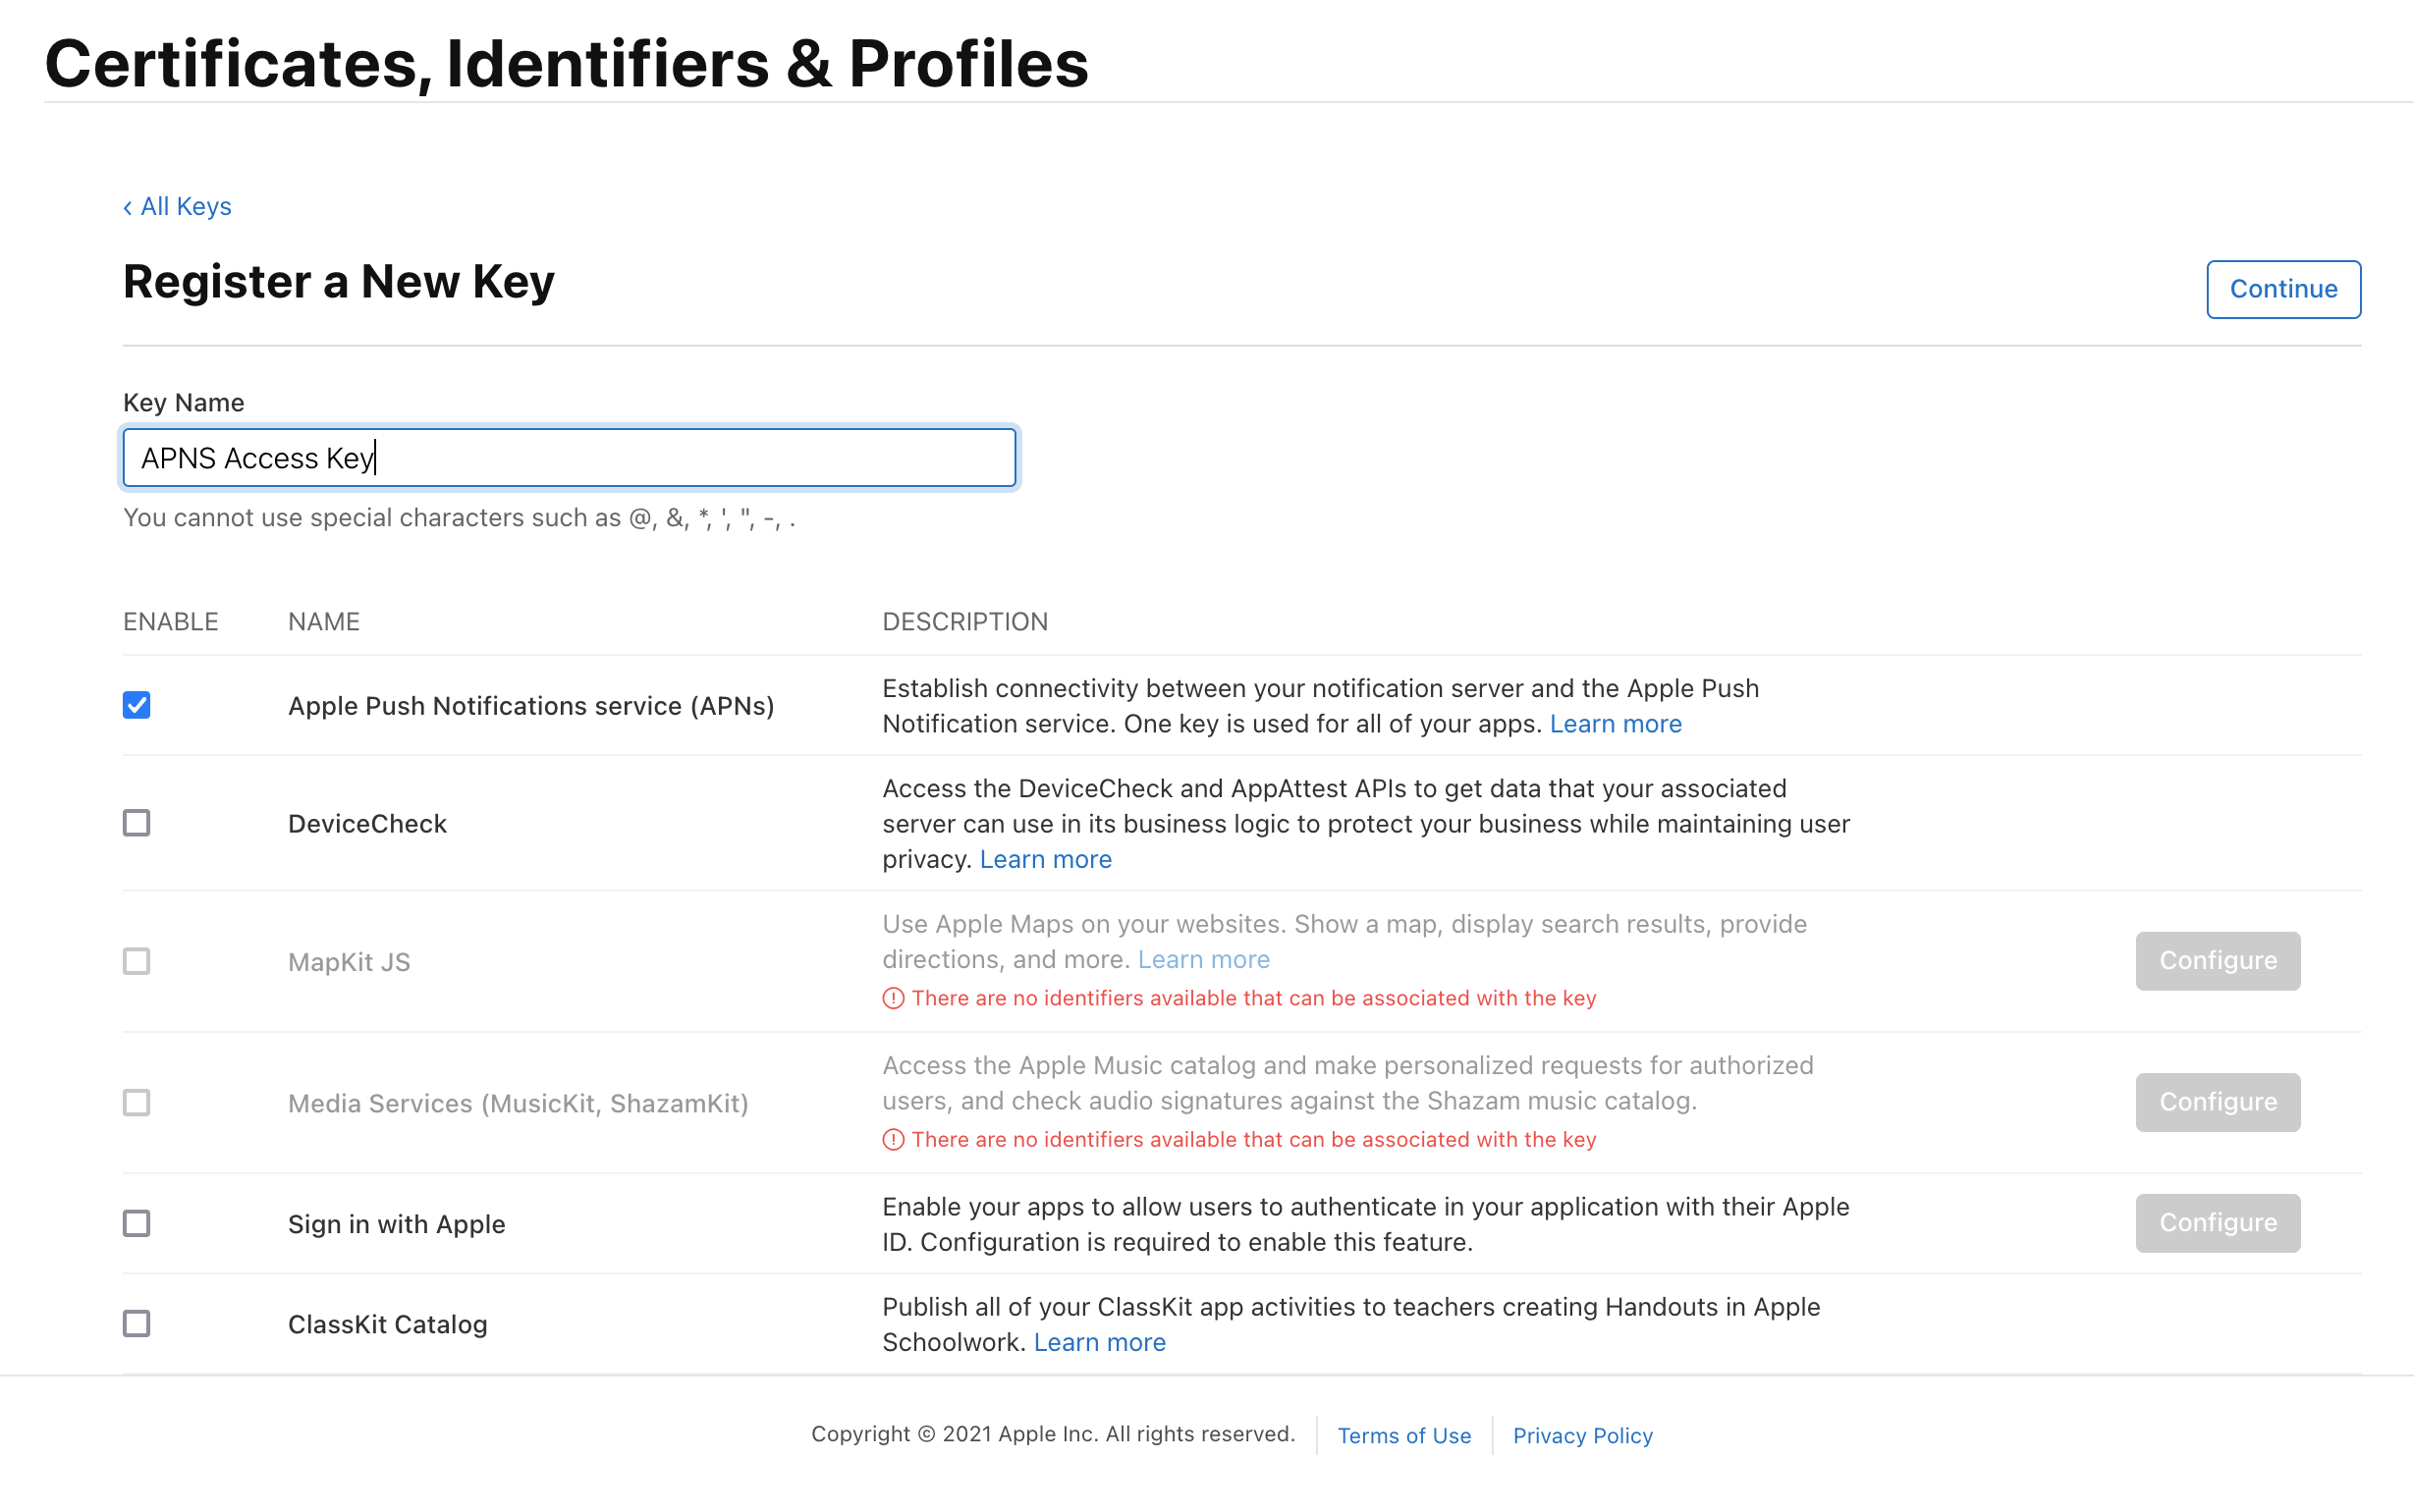
On the confirmation screen double-check the APNs enablement is set then click "Register".
On the final screen, note your KeyID and download the key. This will save a .p8 file containing the access credentials. Note that the key can only be downloaded once. If lost, it must be revoked and re-created.
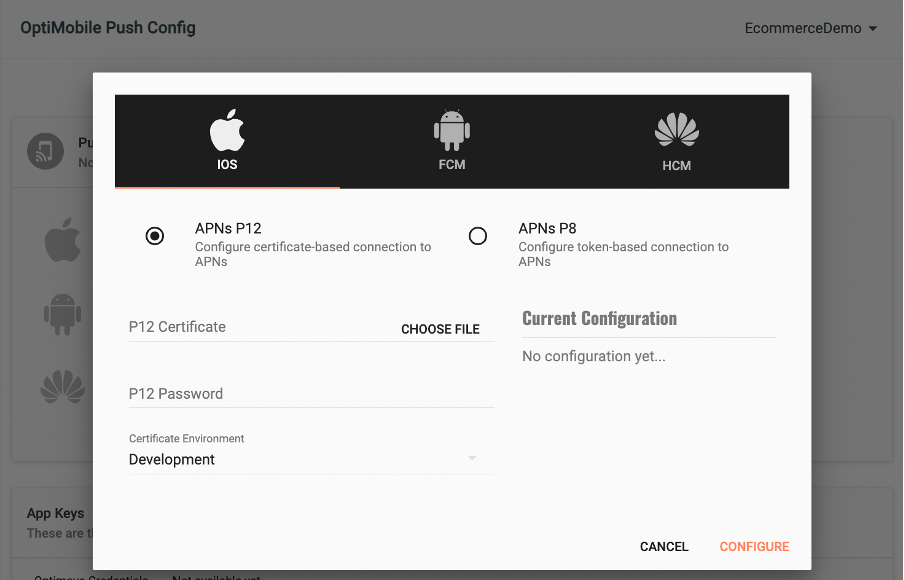
You now have all the details to configure your App, so navigate to the Settings area of the site, scroll to OptiMobile, and select Mobile Push Config. Click the cog next to the Apple icon. Select APNs P8 and select your file, enter your other details and click "Configure".
FCM Configuration
In order to enable push notifications for Android with Optimove, you'll need to set up an FCM project and configure push for your app.
Optimove requires a service account to execute campaigns for your FCM project. This service account should contain a custom role with just one permission - cloudmessaging.messages.create (you can read about custom roles here, about this specific permission here)
Please note it is the Google Service Account private key JSON file that needs to be uploaded to your mobile UI, not the Google Services JSON file you include in your app project.
Follow these steps to generate this key:
- Go to your Google Cloud Platform console
- Navigate to IAM & Admin
- Navigate to Roles
- Click on "Create Role" at the top
- Fill the fields (As a name you can choose something like 'Optimove FCM')
- Click on "Add Permissions"
- Search for
cloudmessaging.messages.createand choose it - Click create
- Navigate to Service Accounts
- Click on "Create Service Account" at the top
- Select the custom role you created in 8
- Click done
- Click on the service account you generated
- Generate a key to this service account
If you have multiple App projects (for example, one for production and one for staging), you must perform this step for each project.
Once you have generated the JSON file, navigate to the Settings area of the site, scroll to OptiMobile, and select Mobile Push Config. Click the cog next to the Android icon. Select your Google Service Account JSON file and click "Configure".
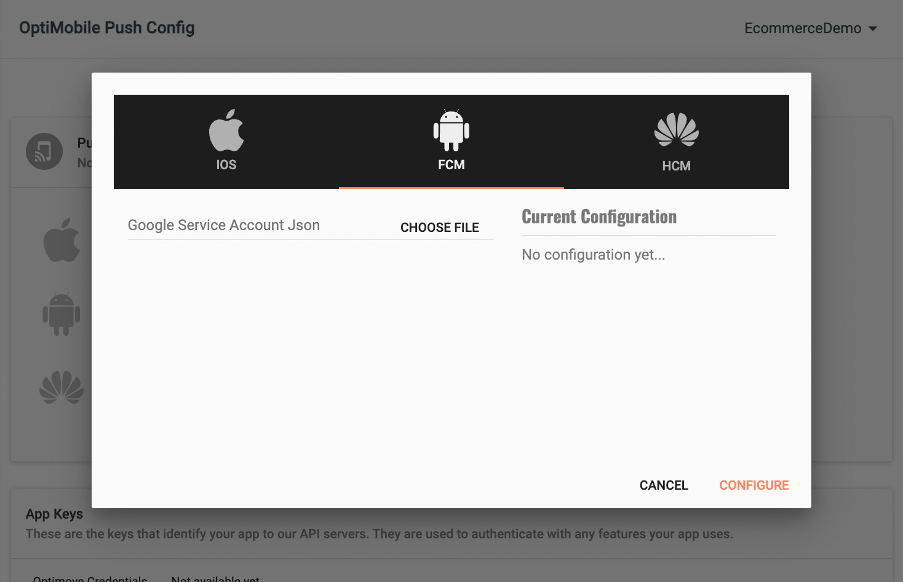
ImportantThe latest Huawei handsets such as the P40 family of phones do not use FCM for push notifications and instead use Huawei Cloud Messaging (HCM). If you want to message all your Android users, including those using Huawei phones, then in addition to FCM you also need to configure HCM.
HCM Configuration
After completing the FCM configuration, you also need to:
- Set up an app on the Huawei Mobile Developer Console
- Configure Push in the Mobile Marketing UI
- Add Huawei Mobile Services dependencies, files, and plugins to your project
- Add Huawei-specific manifest entries
All other push behavior & customization works identically to FCM.
To begin, configure a project on the Huawei Developer Console, and enable the Push feature by following the Push Kit developer guide step 1.
Note that your app needs a valid signing configuration for both debug and release builds. The SHA-256 fingerprint of your signing key is required to match the Huawei app configuration prior to continuing.
Once you have created the app, configure the HCM gateway in Optimove. Navigate to the Settings area of the site, scroll to OptiMobile, and select Mobile Push Config. Click the cog next to the Huawei icon. Add your App ID and App Secret and click "Configure".
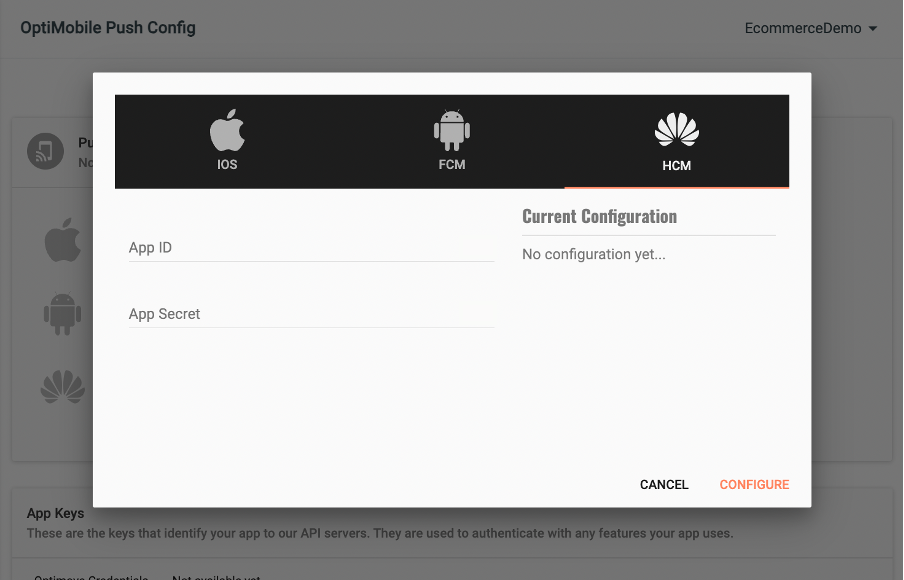
App Setup
Once you've configured the Mobile Push Gateways and the appropriate push notification setup for your platform, follow the SDK integration steps below.
In your app project settings use the "+ capability" button to add the Background
Modes and Push Notifications capabilities, in Background Modes you should have
the "Remote Notifications" mode checked.

Note: you must use a real device to test push notifications on iOS because simulators cannot
register for push notifications.
/*
1. Preliminary Setup:
- Ensure you've added the necessary Firebase components to your app.
- For more information, visit: https://firebase.google.com/docs/android/setup.
2. Edit the build.gradle Files:
- In your root build.gradle file, ensure the Google repository is enabled and the
google-services plugin is on the classpath: */
buildscript {
// ...
dependencies {
// ...
classpath 'com.google.gms:google-services:4.3.10' // google-services plugin
}
}
allprojects {
// ...
repositories {
google() // Google's Maven repository
// ...
}
}
/*
- In your app module's build.gradle file, add the FCM dependency and apply the google-services
plugin. Note: Optimove supports Firebase Messaging version range [19.0.0, 22.99.99], which
corresponds to Bill of Materials version range [20.0.0, 28.99.99]. */
apply plugin: 'com.android.application'
dependencies {
...
implementation 'com.optimove.android:optimove-android:7.+'
// Add library dependency to retrieve FCM push tokens
implementation platform('com.google.firebase:firebase-bom:28.2.0')
implementation 'com.google.firebase:firebase-messaging'
}
// ADD THIS AT THE BOTTOM
apply plugin: 'com.google.gms.google-services'
/*
3. Add google-services.json:
- Download the google-services.json file from your Firebase app's 'General' settings.
- Add this file to your app/ folder.
4. Update AndroidManifest.xml:
- Add the OptimoveFirebaseMessagingService and PushBroadcastReceiver to your
AndroidManifest.xml file: */
<?xml version="1.0" encoding="utf-8"?>
<manifest xmlns:android="http://schemas.android.com/apk/res/android"
package="com.example">
<!-- Optionally add the wake lock permission to stop the CPU from sleeping when a message is received -->
<!-- <uses-permission android:name="android.permission.WAKE_LOCK" /> -->
<!-- Optionally add the boot completed permission to allow periodic tasks to persist across phone reboots -->
<!-- <uses-permission android:name="android.permission.RECEIVE_BOOT_COMPLETED" /> -->
<application
android:name=".ExampleApp"
android:allowBackup="true"
android:icon="@mipmap/ic_launcher"
android:label="@string/app_name"
android:supportsRtl="true"
android:theme="@style/AppTheme">
<!-- Other application components -->
<!-- Optimove FCM handler -->
<service android:name="com.optimove.android.optimobile.FirebaseMessagingService" android:exported="false">
<intent-filter>
<action android:name="com.google.firebase.MESSAGING_EVENT" />
</intent-filter>
</service>
<!-- Optimove Push receiver -->
<receiver android:name="com.optimove.android.optimobile.PushBroadcastReceiver" android:exported="false">
<intent-filter>
<action android:name="com.optimove.push.RECEIVED" />
<action android:name="com.optimove.push.OPENED" />
<action android:name="com.optimove.push.DISMISSED" />
<action android:name="com.optimove.push.BUTTON_CLICKED" />
</intent-filter>
</receiver>
</application>
</manifest>
/********************** Huawei **********************
1. Add the agconnect-services.json file (downloaded from the Huawei developer console) to
ndroid application directory.
2. Add the Huawei repository and plugin dependency to your root build.gradle: */
buildscript {
repositories {
...
maven {
url 'https://developer.huawei.com/repo/'
}
}
dependencies {
...
classpath 'com.huawei.agconnect:agcp:1.2.1.301'
}
}
allprojects {
repositories {
...
maven {
url 'http://developer.huawei.com/repo/'
}
}
}
/*
3. In your app-level build.gradle, add the HMS Push Kit dependency and apply the HMS plugin: */
dependencies {
...
implementation 'com.huawei.hms:push:6.1.0.300'
}
// Add to bottom of file
apply plugin: 'com.huawei.agconnect'
/*
4. Add the HMS push service to your AndroidManifest.xml: */
<!-- Optimove HMS Messaging Service -->
<service
android:name="com.optimove.android.optimobile.HmsMessagingService"
android:exported="false">
<intent-filter>
<action android:name="com.huawei.push.action.MESSAGING_EVENT" />
</intent-filter>
</service>
/*
5. Push registration should be performed as with FCM. //HELP By this do we mean allowing push notificaitons?
6. Huawei Troubleshooting
- Ensure the app signing key fingerprint matches in the Huawei developer console
- Ensure the app package matches the configuration in the Huawei developer console
- Ensure the Push Kit service is enabled for your app in AppGallery Connect > App > Develop > Grow > Push Kit. You must enable the service and choose a data storage location.
*/
/********************** Android **********************

1. Preliminary Setup:

   - Ensure you've added the necessary Firebase components to your app.
   - For more information, visit: https://firebase.google.com/docs/android/setup.

2. Edit the build.gradle Files:

   - In your root build.gradle file, ensure the Google repository is enabled and the
   google-services plugin is on the classpath: */

     buildscript {
         // ...
         dependencies {
             // ...
             classpath 'com.google.gms:google-services:4.3.10' // google-services plugin
         }
     }

     allprojects {
         // ...
         repositories {
             google() // Google's Maven repository
             // ...
         }
     }

/*
   - In your app module's build.gradle file, add the FCM dependency and apply the  google-services
   plugin. Note: Optimove supports Firebase Messaging version range [19.0.0, 22.99.99], which
   corresponds to Bill of Materials version range [20.0.0, 28.99.99]. */

     apply plugin: 'com.android.application'

     dependencies {
         ...
         implementation 'com.optimove.android:optimove-android:7.+'
         // Add library dependency to retrieve FCM push tokens
         implementation platform('com.google.firebase:firebase-bom:28.2.0')
         implementation 'com.google.firebase:firebase-messaging'
     }

     // ADD THIS AT THE BOTTOM
     apply plugin: 'com.google.gms.google-services'

/************************ iOS ************************

In your app project settings use the "+ capability" button to add the Background
Modes and Push Notifications capabilities, in Background Modes you should have
the "Remote Notifications" mode checked.

Note: you must use a real device to test push notifications on iOS because simulators cannot
register for push notifications. */
/********************** Android **********************
1. Preliminary Setup:
- Ensure you've added the necessary Firebase components to your app.
- For more information, visit: https://firebase.google.com/docs/android/setup.
2. Edit the build.gradle Files:
- In your root build.gradle file, ensure the Google repository is enabled and the
google-services plugin is on the classpath: */
buildscript {
// ...
dependencies {
// ...
classpath 'com.google.gms:google-services:4.3.10' // google-services plugin
}
}
allprojects {
// ...
repositories {
google() // Google's Maven repository
// ...
}
}
/*
- In your app module's build.gradle file, add the FCM dependency and apply the google-services
plugin. Note: Optimove supports Firebase Messaging version range [19.0.0, 22.99.99], which
corresponds to Bill of Materials version range [20.0.0, 28.99.99]. */
apply plugin: 'com.android.application'
dependencies {
...
implementation 'com.optimove.android:optimove-android:7.+'
// Add library dependency to retrieve FCM push tokens
implementation platform('com.google.firebase:firebase-bom:28.2.0')
implementation 'com.google.firebase:firebase-messaging'
}
// ADD THIS AT THE BOTTOM
apply plugin: 'com.google.gms.google-services'
/************************ iOS ************************
In your app project settings use the "+ capability" button to add the Background
Modes and Push Notifications capabilities, in Background Modes you should have
the "Remote Notifications" mode checked.
Note: you must use a real device to test push notifications on iOS because simulators cannot
register for push notifications.********************** Android **********************
1. Add google-services.json file from your Firebase app 'General' settings to the root of your
Cordova project.
2. run: cordova prepare android
************************ iOS ************************
In your app project settings use the "+ capability" button to add the Background Modes
and Push Notifications capabilities, in Background Modes you should have the
"Remote Notifications" mode checked.
Note: you must use a real device to test push notifications on iOS because
simulators cannot register for push notifications./********************** Android **********************
Add the google-services.json file from your Firebase app 'General' settings to the
/Assets/OptimoveConfigFiles folder of your Unity project.
In the /Assets/Plugins/Android/baseProjectTemplate.gradle file, uncomment the following line: */
classpath 'com.google.gms:google-services:4.3.14'
/*
In the /Assets/Plugins/Android/launcherTemplate.gradle file, uncomment the following lines: */
implementation platform('com.google.firebase:firebase-bom:28.2.0')
implementation 'com.google.firebase:firebase-messaging'
...
apply plugin: 'com.google.gms.google-services'
/************************ iOS ************************
No additional steps needed.
Allow push notifications
When you consider it appropriate, you need to request permission from the user to send them push notifications. You can potentially use an in-app message to prompt the user to accept push at a later time.
Whilst you can handle this yourself, Optimove provides a convenience method. When the user accepts, the Optimove SDK will store the push token.
Optimove.shared.pushRequestDeviceToken()

//At this point, Optimove should receive the device token through the didRegisterForRemoteNotificationsWithDeviceToken delegate.
//IMPORTANT - IF you have an implementation of your own for didRegisterForRemoteNotificationsWithDeviceToken, make sure you call pushRegister in it:

public func application(_: UIApplication, didRegisterForRemoteNotificationsWithDeviceToken deviceToken: Data) {
  // your implementation

  Optimove.shared.pushRegister(deviceToken)
}
Optimove.getInstance().pushRequestDeviceToken(); // Starting from Android 13, this method will open the notification permission request prompt Optimove.pushRequestDeviceToken();Optimove.pushRequestDeviceToken();Optimove.pushRequestDeviceToken();Optimove.Shared.PushRegister();Make sure to provide your OptiMobile credentials during the initialization, as they are necessary for Push Messaging.
Send Test Push
After allowing push notifications on the device, go to the Installs tab, found under OptiMobile in the Settings area. You will notice that the install is now registered for push. Click on an install, click the Push tab, and click Send Test Push.
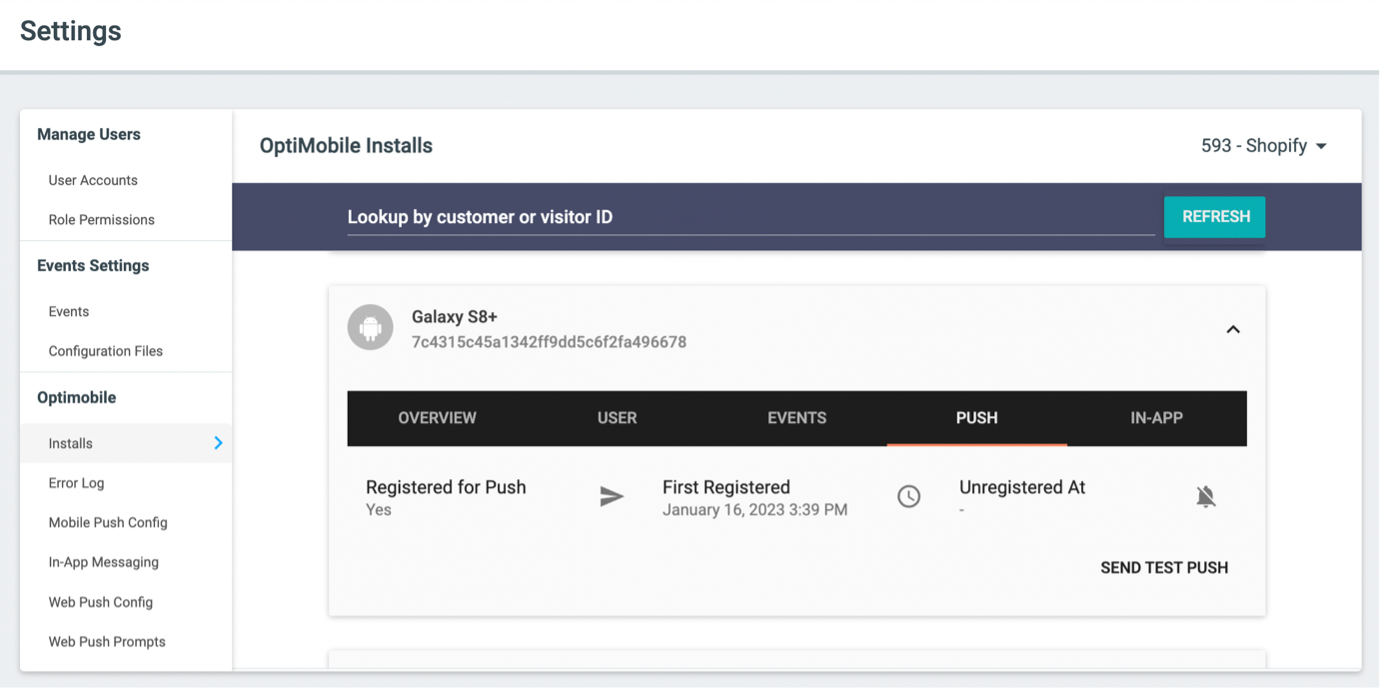
If you do not receive the push notification, check the Error Log for any errors sending the push notification to the native push gateways. If you continue to experience problems, please contact your CSM for support in troubleshooting the configuration.
Opt-outs
If at a later stage the user wishes to opt out from push notifications without blocking them via the Notification Center Optimove provides a convenience method. This will mark the token as soft-deleted in Optimove to allow for easy re-enabling later.
Optimove.shared.pushUnregister()Optimove.getInstance().pushUnregister();Optimove.pushUnregister();Optimove.pushUnregister();Optimove.pushUnregister();Optimove.Shared.PushUnregister();Reviewing Your Configuration
To review your messaging gateway configuration, Navigate to the Settings area of the site, scroll to OptiMobile, and select Mobile Push Config. This will show how many installs are subscribed to receive push notifications and how many users have opted in to receive in-app messages, broken down by platform.
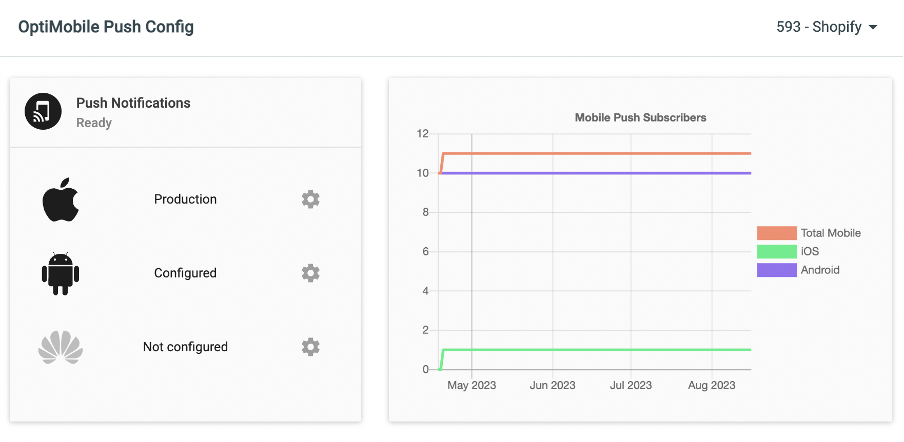
Updated 4 months ago
With the SDK now set up, you can explore our SDK reference for a complete list of features and review our testing and troubleshooting guide.